Motor Mounts - 2008 Chevy Tahoe Z71 4x4

Disclaimer: Links on this page pointing to Amazon, eBay and other sites may include affiliate code. If you click them and make a purchase, we may earn a small commission.

Axm1096

Member
Joined
Nov 23, 2020
Posts
51
Reaction score
24
@wsteele @swathdiver @Fubar0715 I just replaced the passenger side motor mount, transmission mount, and sway bar bushings. This is what I did:
- Remove the front tires
- Remove the manifolds heatshields and fender liners.
- Remove steering shaft above motor mount if replacing driver side, undo the bolts and push it towards the firewall to remove it from the steering joint.
- Undo the bottom 3 bolts on both the driver and passenger side motor mounts, I bought a very VERY long 1/2 inch extension and I was able to get them from above using an impact drill. You can also get at some of these from the fenders.

- Undo the nuts and bolts for the transmission mount.
- Remove the starter, its 2 bolts and then I just let it hang down.
- Then jack up the drivetrain at the location of the drain plug using a 4x4 or 2 between the jack and the oil pan.
- At this point the transmission mount can be taken out so install the new Trans mount.
- Undo the top 4 bolts on the motor mounts. The metal shield on the mounts can be manipulated to make things easier, I started by opening the metal up to expose more of the bolts.

- On the driver side I was able to get at these 4 bolts from the fender using some deep sockets, a 1/2 inch swivel head ratchet, and a 1/2 inch "Flex Head Stubby Ratchet".
- Remove the driver side mount by compressing the metal shield and pulling it out the top where the steering shaft used to be. I was able to remove this one in 1 piece.
- Install the driver side mount using only the 4 top bolts.
- Remove the 4 top bolts on the passenger motor mount. I was able to get at 3 bolts from the fender using some deep sockets, a 1/2 inch swivel head ratchet, and a 1/2 inch "Flex Head Stubby Ratchet". The bottom right bolt I had to use my very VERY long 1/2 inch extension to get at it from under the steering rack, if you get on your back you can thread the needle of the steering rack, crossmember and diff you can see the last bolt.

- Removing the passenger motor mount was the most difficult part. I had to remove the 2 nuts on the mount to take it apart and make it easier to remove.
- Install the passenger side mount, the Hummer H3 mount is easier to install than the factory but this was still a very hard task. Use only the 4 top bolts.
- Lower the drivetrain and install the nuts and bolts for the transmission mount and the lower 3 bolts for both motor mounts. I had issues with the transmission not lining up to the mount holes so I just jacked up the drivetrain just a little bit and lined up the transmission to the trans mount with a screw driver through the bolt holes then I installed the trans mount bolts a few turns to keep it lined up then I dropped it back down again and finished tightening everything.

- Reinstall the starter.
- After that you just need to button everything back together, the manifold heatshields and the fender liners.

This job took me about 4.5 Hours. I used AcDelco part number 25847739 on both sides.
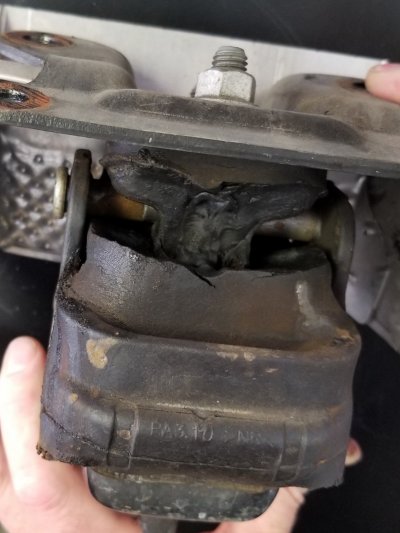
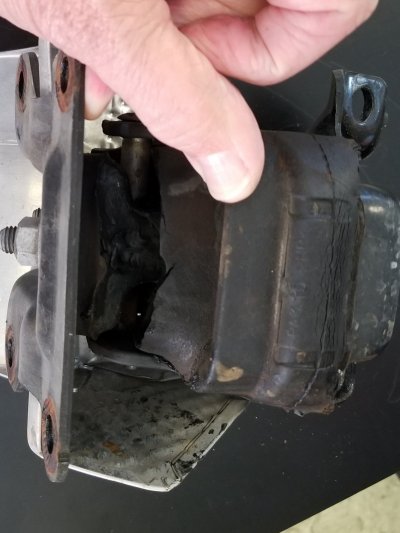
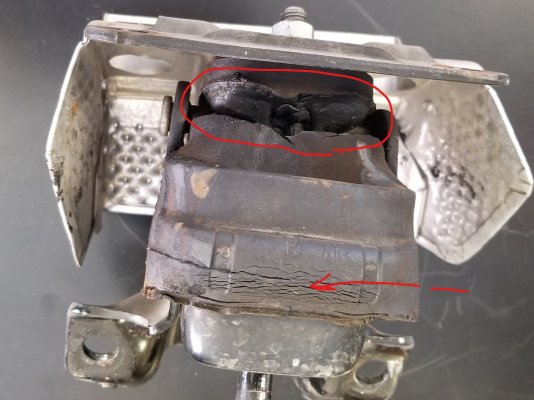
Will the 25847739 work on the 07 Yukon denali
 

rdhogg

Full Access Member
Joined
Oct 28, 2011
Posts
491
Reaction score
1,241
Location
Houston
For about a year my Tahoe has had a clunk when accelerating quickly from a stop and I always thought it was something to do in the rear end. Today I tried hitting the accelerator while my foot was on the brake and I was able to replicate the problem. I popped the hood and did it again and I can see my motor shifting and causing the clunk.

I have done a little bit of research and found that I will want to use H3 motor mounts but most of the videos I have seen on this job are for 2WD Tahoes. I climbed under the front and see that the front axle completely covers the driver side mount.

I am looking to you guys for wisdom on your experiences of replacing the motor mounts on a 4x4 08 Tahoe with hand tools and a floor jack in a driveway or if I just need to take it to the mechanic.

I appreciate any personal experiences or tip/tricks.


Thanks for your time
For about a year my Tahoe has had a clunk when accelerating quickly from a stop and I always thought it was something to do in the rear end. Today I tried hitting the accelerator while my foot was on the brake and I was able to replicate the problem. I popped the hood and did it again and I can see my motor shifting and causing the clunk.

I have done a little bit of research and found that I will want to use H3 motor mounts but most of the videos I have seen on this job are for 2WD Tahoes. I climbed under the front and see that the front axle completely covers the driver side mount.

I am looking to you guys for wisdom on your experiences of replacing the motor mounts on a 4x4 08 Tahoe with hand tools and a floor jack in a driveway or if I just need to take it to the mechanic.

I appreciate any personal experiences or tip/tricks.


Thanks for your time.
Thanks Dustin for your post. I wish I would have searched our Forum when I was experiencing the same thing on my 2013 Tahoe 2X2. I have been cranking wrenches (as a hobby and fun) for a long time and I am embarrassed to say that I have never had to deal with a motor mount issue. When I say a long time let just say I am still mad that I had to add a **** pot full of metric tools to my tool-box back in the day. I never had an issue with motor mounts in my new '66 GTO Tri-Power with Muncie 4-speed Posti track. You could power shift all day and everything was always solid. Did a lot of street racing, no prob. Then I got my '69 442 4-speed, same thing. I was ******* them. Fast forward to my Tahoe, leaving from a light and hwy passing gear , no prob, but foot on the brake and increase the RPM's 'CLUNK'. Long story short, we have a great source of help and information here on this Forum and I did not use it FIRST. Put you foot on the break and increase the RPM and watch the engine (driver side) rise a few inches. The drivers side takes the most stress during accelerating, and is most likely to fail before the passenger side. The normal visual checks (universals, tranny mounts, and other rubber related failures) most likely will not indicate motor mount at least on this range of Tahoe's, because the heat shield hides the mount and with the weight of the engine on the mount, you cannot see any cracks or dry rot. Changing the motor mount is above my pay grade, so I turned this job off to my trusty, long time mechanic, but it can be done yourself. Thanks again Dustin for the info and
YouTube
 

Attachments

  • 2013 Tahoe motor mount 1.jpg
    2013 Tahoe motor mount 1.jpg
    246.6 KB · Views: 9
  • 2013 Tahoe motor mount 3.jpg
    2013 Tahoe motor mount 3.jpg
    214.7 KB · Views: 9
  • 2013 Tahoe motor mount crack.jpg
    2013 Tahoe motor mount crack.jpg
    251.6 KB · Views: 8
OP
OP
Dustin Jackson

Dustin Jackson

Full Access Member
Joined
Aug 9, 2018
Posts
1,402
Reaction score
1,545
@rdhogg Looks like it was due, when the drive mount has that much play in it I am sure it accelerates the wear on the passenger side.
 

2Cool2Fool

TYF Newbie
Joined
Aug 11, 2021
Posts
8
Reaction score
20
Replaced my drivers side last weekend on my 07 Yukon 5.3. It was not easy. In my opinion, it is impossible to do from the top. I pulled the tire and the fender well liner (about a 5 minute job) and had access to all 4 bolts - but it took a pretty good collection of extensions, wobble sockets and impact tools. I used my Port-Power to jack the engine. Since this truck will only see very limited mileage over the years I'll own it, I decided to bag the heatshield from the new mount. It makes the re-install a lot easier. BTW - there are about 20 YouTube videos about how to replace these mounts...and a few of them were very helpful.
 
OP
OP
Dustin Jackson

Dustin Jackson

Full Access Member
Joined
Aug 9, 2018
Posts
1,402
Reaction score
1,545
Replaced my drivers side last weekend on my 07 Yukon 5.3. It was not easy. In my opinion, it is impossible to do from the top. I pulled the tire and the fender well liner (about a 5 minute job) and had access to all 4 bolts - but it took a pretty good collection of extensions, wobble sockets and impact tools. I used my Port-Power to jack the engine. Since this truck will only see very limited mileage over the years I'll own it, I decided to bag the heatshield from the new mount. It makes the re-install a lot easier. BTW - there are about 20 YouTube videos about how to replace these mounts...and a few of them were very helpful.
@2Cool2Fool I agree, this was the most difficult job I have ever done on my Tahoe. If you think the driver side was hard just wait until you have to do the passenger side. This job separates the men from the gentlemen.
 

Forum statistics

Threads
129,239
Posts
1,812,624
Members
92,339
Latest member
Thekenstar
Top