Been a little busy

Disclaimer: Links on this page pointing to Amazon, eBay and other sites may include affiliate code. If you click them and make a purchase, we may earn a small commission.

preston

Member
Joined
May 2, 2009
Posts
35
Reaction score
0
Location
Humble, TX
I been doing a little work to the Yukon lately.

I got the rear half of the car interior as well as the whole roof sound deadened. I used RAAMmat BXT followed by their Ensolite foam.

I also blacked out my headlights.

Here are a quick pictures (iPhone quality pics suck I know)
 

Attachments

  • IMG_0151.jpg
    IMG_0151.jpg
    90.5 KB · Views: 53
  • IMG_0181.jpg
    IMG_0181.jpg
    94.5 KB · Views: 58
  • IMG_0184.jpg
    IMG_0184.jpg
    92.3 KB · Views: 52
  • IMG_0290.jpg
    IMG_0290.jpg
    89 KB · Views: 82

Modded

That Guy
Joined
May 3, 2009
Posts
6,942
Reaction score
107
Looks quiet!
I better see atleast 3 W7s, or L7s to justify that work. :D
 

rogersinsel

Full Access Member
Joined
May 4, 2009
Posts
169
Reaction score
0
I been doing a little work to the Yukon lately.

I got the rear half of the car interior as well as the whole roof sound deadened. I used RAAMmat BXT followed by their Ensolite foam.

I also blacked out my headlights.

Here are a quick pictures (iPhone quality pics suck I know)

Why?
 

1sikyukon

Full Access Member
Joined
May 5, 2009
Posts
473
Reaction score
2
Location
SFV, CA
If you dont mind taking the time to tell me how u did the headlights that would be awesome! planning on doing this mod this coming week or so. Please help me out!
 
OP
OP
preston

preston

Member
Joined
May 2, 2009
Posts
35
Reaction score
0
Location
Humble, TX
Thank for all the comments!!!

As for sub plans, I'm not sure on what I'll be doing. I use my third row
seating way too often to be yanking a big sub box in and out.
Been thinking about seeing what can be fit into the rear wheel well area
where the jack is.

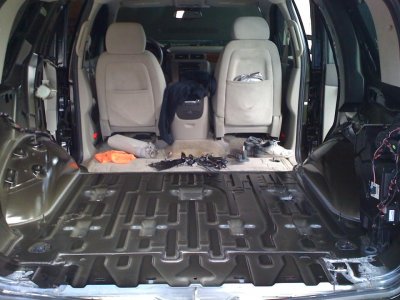
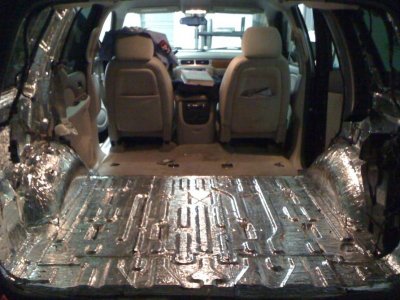
The main goal though with the RAAMmat and ensolite is just to make it a
quieter ride for those long trips.

As for how to do the headlights, I followed a how-to I read a long time ago
over on tahoeforum.com. It's pretty straight forward though.

-Preheat oven to 180
-Bake headlight for 10 minutes the first time
-Take out headlight and start prying it apart at the seam.
(It's tough to get started but once you get a little bit
going you can just pull it apart with your hands)
-Put it back in the oven after a minute minutes of
trying to seperate the lense to keep the adhesive soft,
but only for about five minutes this time.
-Repeat until you have it apart (took me 4 times in the oven)
-Once apart, there are a few screws to take out and then just
pop out the orange lense and the turn singnal lense.
-Paint as desired.
-Reassemble in reverse order.

Hit me up if you need help when doing it and I'll try to give some
advice on little things I came across.

I used an etching primer followed by SEM exterior trim paint (both
in rattle can form).

I just bought some G4's off of Denali132 and they should be here
on Monday, I can't wait to get them on.

It's coming together slowly!
 

Effeckt

Resident Cards Fan
Joined
Jul 31, 2009
Posts
2,193
Reaction score
32
Location
Phoenix, AZ
Looks great! You've definitely put a lot of work into it. Keep us posted on the progress!
 

Forum statistics

Threads
129,359
Posts
1,814,571
Members
92,515
Latest member
GMC GUy
Top