You are using an out of date browser. It may not display this or other websites correctly.
You should upgrade or use an alternative browser.
You should upgrade or use an alternative browser.
6.2L L94 & 6L80 into my 1992 Blazer
- Thread starter Nak
- Start date
Disclaimer: Links on this page pointing to Amazon, eBay and other sites may include affiliate code. If you click them and make a purchase, we may earn a small commission.
Got the fan mounts done. I'll post pics of the fan shroud later, I had to chop it up a bit to make it fit. Most of that won't show though, should look pretty factory. BTW, the connectors for the motors are GM # 13580874 or ACDelco PT2649. $15 at Amazon.
Thanks! Yeah, it should be almost too much fun! The 6l80 has roughly a 4:1 1st gear compared to the roughly 3:1 first with the 700R4. That makes my 3.73 gears the equivalent of 5.00's.  Combined with the ridiculously fat torque curve that the VVT gives you it should be quite the rocket sled. I'm actually worried that even with the Trutrac rear I might not be able to keep any kind of traction at full throttle.
 Combined with the ridiculously fat torque curve that the VVT gives you it should be quite the rocket sled. I'm actually worried that even with the Trutrac rear I might not be able to keep any kind of traction at full throttle.
very cool
Thanks Bowtie! That means a lot coming from the owner of arguably one of the best 2 doors anywhere! Love your truck man!
---------- Post added at 11:38 PM ---------- Previous post was at 10:44 PM ----------
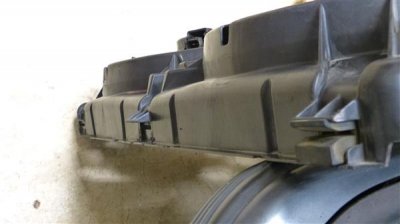
Here's the Fan pics. This would be a great mod even for a Stock 350. I picked up a low mileage fan setup complete for $120 on eBay.
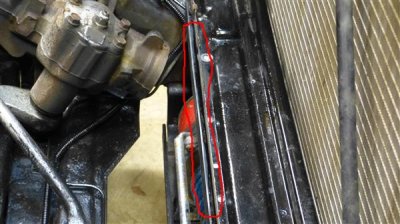
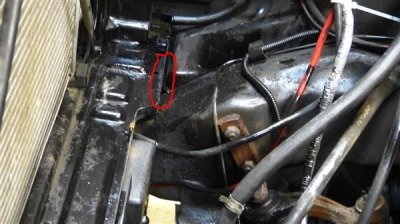
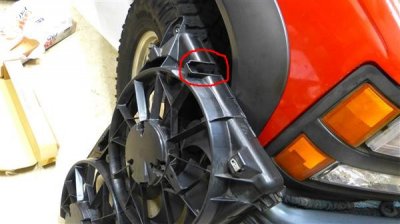
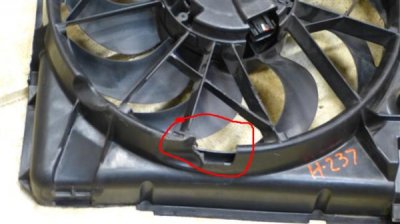
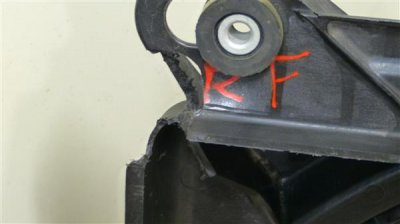
I trimmed the bottom down about 1/2" so that it was even with the ridge. Trim the top by the same amount the bottom was trimmed. I also had to remove the driver's side bottom mount; it interfered with the frame. You can see I trimmed the middle mount too. I had to notch the top on both sides to clear the top radiator supports. I cut off extensions on both the left and right side which left a hole, as you can see on the passenger side. I'll patch that later. Then I braced the bottom radiator support with 1/8" x 3" aluminum plate. Below that I mounted a 1/8" x 1.25" steel plate angle iron. That was mounted as to leave 3/8" clearance from the bottom radiator support. I stopped short of my winch control box on the passenger side. The extra wide portion of the bottom support circled in red matches up perfectly with the passenger side bottom mount on the fan shroud.
Later, I'll use a piece of sheet metal to complete the top mount. I'll clean up the cuts with some sandpaper; should look pretty factory when it's done, at least from the top. LOL
This works great! There'es a bit of space on the left and right side between the shroud and the radiator--about 3/8"--which I'll fill with heat resistant foam tape. Easy to put bolt up, easy to remove. Just slide the fan shroud down into the gap between the angle iron and the bottom radiator support, install bolts at top. Factory parts and lots of airflow.
Attachments
Last edited:
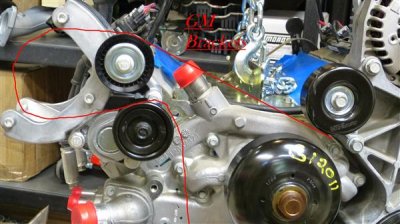
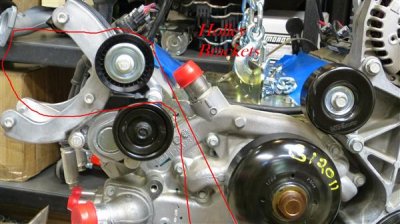
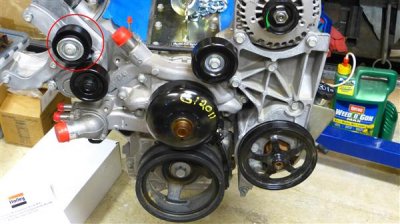
Got the Holley AC bracket on. Very nice; looks factory. There is one issue. If you look at the idler pulley I circled in red, you can see it is not needed. If you use all of the Holley LS brackets, the belt comes up to the top of the AC compressor from the water pump; so it is needed in that case. However, if you're only using the Holley AC bracket and the rest of the brackets are GM, the belt routes from under the upper right idler pulley to the top of the AC. The circled pulley actually hurts you in this case. It put's the belt closer to being up in the way, it reduces contact with the AC pulley and it adds one more pulley that can fail.
I haven't decided for sure yet, but I think I'll cut off the boss that holds the red circled pulley.
I haven't decided for sure yet, but I think I'll cut off the boss that holds the red circled pulley.
Attachments
Tiki
Full Access Member
- Joined
- Jun 4, 2013
- Posts
- 639
- Reaction score
- 318
Awesome project man!
livingez_123
Full Access Member
Holley didn't give you a belt routing diagram? I would call them before doing any cutting.
Similar threads
- Replies
- 2
- Views
- 564
- Replies
- 12
- Views
- 905
Forum statistics
Latest posts
-
-
What did you do to your 2015-2020 K2XX Tahoe/Yukon Today?
- Latest: the 18th letter
-
-

