I see. My old Escalades had very similar LEDs but I looked at a photo of them and the brake light is a bit different. I just assumed they were standard as everything else on a Denali seems to be the same as my old Escalades. I guess these are after markets. Either way, it is not the assembly that is the problem.As posted above, I tested by switching assemblies.
You are using an out of date browser. It may not display this or other websites correctly.
You should upgrade or use an alternative browser.
You should upgrade or use an alternative browser.
2008 Denali Driver's Tail Light
- Thread starter StuckinMN
- Start date
Disclaimer: Links on this page pointing to Amazon, eBay and other sites may include affiliate code. If you click them and make a purchase, we may earn a small commission.
Yes, I understood that but it's not the same is testing the voltage and resistance to ground at the connector where the light is supposed to be working, but isn't. It could be that you have a weak or intermittent ground on the circuit for the running light function. Electrical testing 101: get your meter out and start following the testing procedures outlined in the service manual.As posted above, I tested by switching assemblies.
OK, I was out of town - so no progress. I brought a new light switch but it didn't help so I returned it.
Summary: I switched the assembly and assembly is good. So must be wiring.
Winter is coming so I haven't felt like checking the wiring. And I am not so sure where the most likely failure points would be.
Summary: I switched the assembly and assembly is good. So must be wiring.
Winter is coming so I haven't felt like checking the wiring. And I am not so sure where the most likely failure points would be.
petethepug
Michael
LED lamps can be a nightmare on this platform because the voltage drops are monitored by the BCM and interpreted as a lamp that’s out or disconnected.
They can also cause the BCM to need a reflash or replacement from the expected feedback. Bottom line is the 5v can bus reference line is freaking out from the aftermarket LED lamps.
To get it up and going you’ll need to get a set of standard tails on the truck and troubleshoot from there.
They can also cause the BCM to need a reflash or replacement from the expected feedback. Bottom line is the 5v can bus reference line is freaking out from the aftermarket LED lamps.
To get it up and going you’ll need to get a set of standard tails on the truck and troubleshoot from there.
Well, I had time today to tinker with it. I double check the light assembly and it is fine (works on other side).
I tried to test for power and ground at the taillight connectors - but my meter is bad (not sure what I did the other day but DC testing is dead). I will order another one. There goes $8 to China : )
I followed the wiring harness as far as I could. All looked good - but then again I am not that familiar with what can go wrong with a harness sans obvious chewed wires.
I have two mechanics. One European guy rebuilds Audi engines blindfolded. But he isn't an electrical guy. The other moved further away and is getting more picky. He a mobile mechanic so doesn't have a lift.
Shops here are insane. And 90% of mechanics probably aren't going to figure it out quickly.
Gosh, maybe I should just run a wire from the other side's tail light : ) They are aftermarket LEDs so they take less power.
Maybe you can get a set of those magnetic trailer lights from harbor freight!Well, I had time today to tinker with it. I double check the light assembly and it is fine (works on other side).
I tried to test for power and ground at the taillight connectors - but my meter is bad (not sure what I did the other day but DC testing is dead). I will order another one. There goes $8 to China : )
I followed the wiring harness as far as I could. All looked good - but then again I am not that familiar with what can go wrong with a harness sans obvious chewed wires.
I have two mechanics. One European guy rebuilds Audi engines blindfolded. But he isn't an electrical guy. The other moved further away and is getting more picky. He a mobile mechanic so doesn't have a lift.
Shops here are insane. And 90% of mechanics probably aren't going to figure it out quickly.
Gosh, maybe I should just run a wire from the other side's tail light : ) They are aftermarket LEDs so they take less power.
I think the meter will help you sort it out. My bet is on a broken wire between the connector and either the power source or ground.
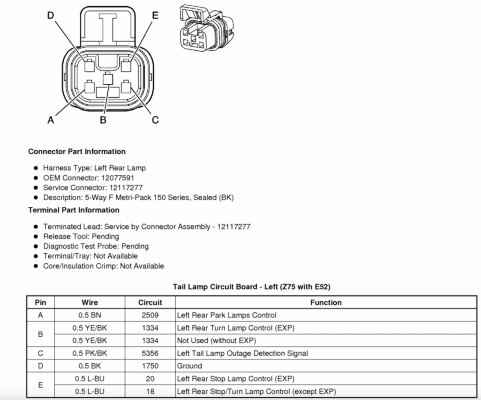
Here's the connector diagram for the driver side.

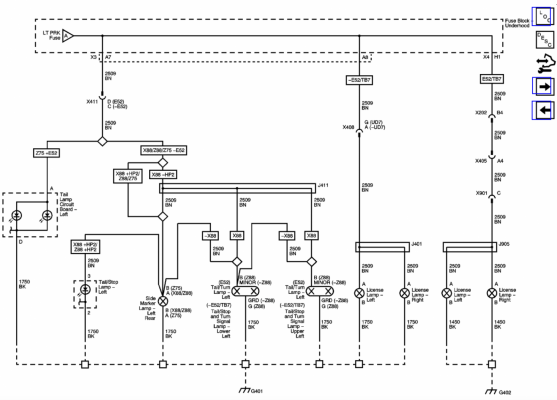
And the wiring schematic for the left side parking lights:

Park, License, and/or Tail Lamps Malfunction
- Ignition OFF, disconnect the park lamp relay.
- Ignition ON, verify that a test lamp does not illuminate between the control circuit terminal 87 and ground.
| ¤ | If the test lamp illuminates, test the control circuit for a short to voltage. |
- Verify that a test lamp illuminates between the B+ circuit terminal 86 and ground.
| ¤ | If the test lamp does not illuminate, test the B+ circuit for a short to ground or an open/high resistance. If the circuit tests normal and the B+ circuit fuse is open, test the control circuit terminal 87 for a short to ground. If the circuit tests normal, test or replace the park lamp relay. |
- Verify that a test lamp illuminates between the B+ circuit terminal 30 and ground.
| ¤ | If the test lamp does not illuminate, test the B+ circuit for an open/high resistance. |
- Disconnect the harness connector at the appropriate park/license/marker lamp.
- Ignition OFF, exterior lamps OFF, test for less than 5 ohm between the appropriate ground circuit terminal listed below and ground.
- Park/Turn Signal Lamp - Left or Right front terminal C - with X88
- Park/Turn Signal Lamp - Left or Right front terminal G - with Z88
- Marker Lamp - Left or Right front terminal A - with Z75
- Marker Lamp - Left or Right front terminal B - with Z88 or X88
- Park Lamp - Left or Right front terminal B - Z75
- Tail/Stop and Turn Signal Lamp - Lower Left or Right rear terminal G - w/o X88 - E52
- Tail/Stop and Turn Signal Lamp - Upper Left or Right rear terminal GND - with X88 - E52
- Tail/Turn Signal Lamp - Left or Right terminal G - w/o X88 + E52
- Tail/Turn Signal Lamp - Left or Right terminal GND - with X88 + E52
- Tail/Stop Lamp - Left or Right Rear terminal G - w/o X88 + E52
- Tail/Stop Lamp - Left or Right Rear terminal GND - w/o X88 + E52
- Marker Lamp - Left or Right Rear terminal B - with Z88
- Marker Lamp - Left or Right Rear terminal A - with Z75 or X88 - E52
- Tail Lamp Circuit Board - Left or Right Rear terminal D - with Z75 + E52
- License lamp terminal B
| ¤ | If greater than the specified range, test the ground circuit for an open/high resistance. |
- Connect the harness connector at the park/license/marker lamp.
- Connect a 15 A fused jumper wire between the B+ circuit terminal 30 and the control circuit terminal 87. Verify the park/marker lamps illuminate.
| ¤ | If the park/marker lamps do not illuminate, test the control circuit for an open/high resistance. If the circuit tests normal, replace the inoperative park/license/marker lamp. |
- Connect a test lamp between the control circuit terminal 85 and B+ circuit terminal 86.
- Command the Parking Lamps ON and OFF with a scan tool. The test lamp should turn ON and OFF when changing between the commanded states.
| ¤ | If the test lamp is always ON, test the control circuit for a short to ground. If the circuit tests normal, replace the BCM. |
| ¤ | If the test lamp is always OFF, test the control circuit for a short to voltage or an open/high resistance. If the circuit tests normal, replace the BCM. |
- If all circuits test normal, test or replace the park lamp relay.
Last edited:
