System building

Disclaimer: Links on this page pointing to Amazon, eBay and other sites may include affiliate code. If you click them and make a purchase, we may earn a small commission.

Monkey_Wrench

TYF Newbie
Joined
Sep 15, 2021
Posts
19
Reaction score
16
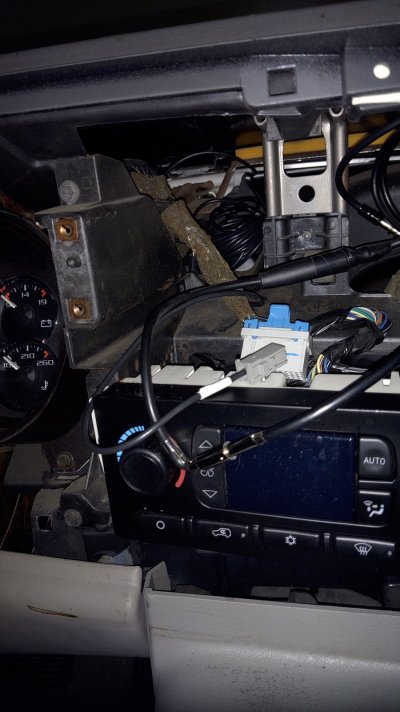
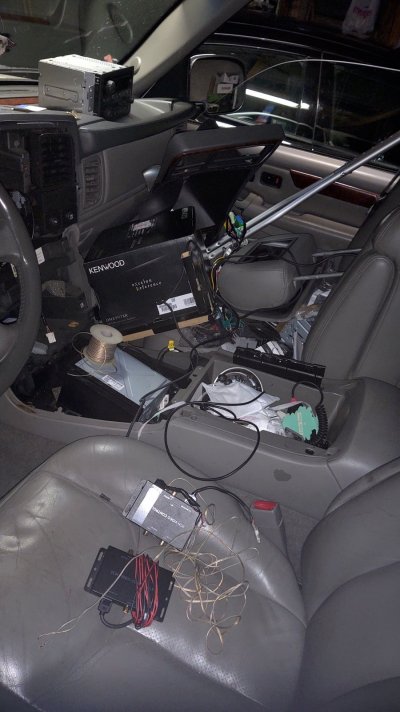
I'm working on beefing up the sound system in my '05 Escalade. I'm not looking for building leveling power. Just want to clean up the sound, fill it out more where it's missing some depth, and add some extra functionality.

To begin with I have installed Newish Old Stock headrest monitors (one was new, the other had a used "brain" but the monitor was "only used for testing purposes. More on that later)

IMG_20210916_005331477.jpg
First step was getting the original headrests out. This side came out ok with a paperclip, I needed to use a sturdier tool to get the other side to cooperate. Note the wire that I used. It isn't the monitor wire. That is soft and floppy. I ran a stiffer wire with semi flexible insulation to find find the path through first. You could also use electrician's "fish tape" which is a semi stiff wire on a retractable spool that you push through then attach you wire you want to run to it and pull it back through.

IMG_20210916_005405587.jpg
The next bit of a faff was getting the bottom of the seat back to unhook from itself. Was a bit fiddly bit did come free with some brute force applied.

IMG_20210916_005844529.jpg
Simple enough. Still has the protective film from the factory on it.

IMG_20210916_013609107.jpg
Another view of the other side seat back bottom. Both sides have a bit of a wedge to latch to each other. After the ease of the first one I was apparently arrogant and the Gods of installion were displeased. The headrest on this side took almost an hour of messing with trying to use the paperclip to get it out before I went to get a different pointy tool, and the bottom took a good half hour of hand cramping frustration to get apart.

IMG_20210916_014452577.jpg
After giving up on finesse I reverted back to force and once one end bent enough to let loose it came undone like a zipper. Getting it back together was a snap at least.
 
OP
OP
Monkey_Wrench

Monkey_Wrench

TYF Newbie
Joined
Sep 15, 2021
Posts
19
Reaction score
16
IMG_20210916_022144563.jpg
After getting it back together I wired the brains directly to the battery to function check. The New new one lit right up, the "New" "test purposes" one did not. Switched brains to see if that was it since the used one looked kind of tatty, but no joy. So, will have to take that one back out and bring it in somewhere to see if it can be repaired.

This is preemptive since I don't have the video player in yet anyway, but that will be going in the next days/weeks to follow, should everything go to plan that is... DVD satnav headunit going in the dash. Claims rear control support so we'll see how that works out.

There is also a non functioning roof DVD that I will see if I can get it to behave, if not that will be replaced and be used as the 2nd input for the headrests.

Beyond that, looking further afield... I'm thinking of either finding an earlier stock sub box for the rear and running an 8" and small amp, or taking measurements and building a small box to fit, with either an 8" or a small form 10" that can handle little cubes. Will look to but a better speaker in the stock center console box and either leave the Bose amp hooked to it or more likely run another small amp. I like to be able to tweak gain vs boost/crossover for different sized subs.

Likely replace the door speakers, probably leaving the Bose amp for them. Likely will leave tweeters alone.

Anyway that's my basic roadmap for what I'd like to, and can realistically do.

Lots more pics and descriptions to follow as it goes along. If anyone has any questions feel free to keep them to yourself because it'll probably just confuse me LOL!

Really though if you have a sincere question feel free to fire away. If you're just trying to sidetrack me, distract me, mislead me, or make me second guess myself then, off is the general direction in which I'd wish you to eff
Kthanks!
 

Joseph Garcia

Supporting Member
Joined
Aug 2, 2018
Posts
6,500
Reaction score
8,498
You had me wondering there for a while. You started off with a statement of wanting to improve your 'sound' system, and then you went into a project build sequence for video screens installation in the headrests.

If you have 2nd row captains chairs, you could install a 10" sub in a custom enclosure between the captains chairs, and it does not have to be bolted to the floor. This way, with a quick disconnect speaker wire, you could move the sub enclosure anytime that you needed the space for something else, or temporarily relocate the sub enclosure to another area in the truck, as needed, with an extension speaker wire. AudioMobile makes excellent subs designed specifically for small enclosures, and I have one of these 10" subs in a sealed 1 cu. ft. enclosure, between the captains chairs. The AudioMobile sub is not a pancake design, but instead, uses a traditional cage design. (I am not in any way financially connected with AudioMobile. I just like their American made subs.)

Regarding keeping the Bose amp and installing aftermarket speakers in the doors, keep in mind that the Bose speakers are typically around 1-2 Ohms impedance, and most aftermarket door speakers are 4 Ohms impedance. This could impact the sound level, due to impedance mismatches between the amp and the speakers. It may not be a big issue for you, but I want to at least lay that out there for you. I ripped out the entire Bose system (I am not a fan of Bose systems, but that is just me, as their sound profile does not match my listening desires.), and I replaced it with aftermarket speakers and amps matched to each other from an impedance perspective.

The photo below is my sub enclosure. Please excuse the white dog hair, as my white German Shepherd loves to sit on the sub enclosure and look out the front windshield over my right shoulder, while we are on a 'ride'. Another member on this Forum designed a sub enclosure for this space which included cup holders built into the sub enclosure.

Sub-Woofer Enclosure - Small File.jpg

Sub-Woofer - Bottom View - Small File.jpg

I wish you the best of outcomes on your sound system build project.
 
OP
OP
Monkey_Wrench

Monkey_Wrench

TYF Newbie
Joined
Sep 15, 2021
Posts
19
Reaction score
16
You had me wondering there for a while. You started off with a statement of wanting to improve your 'sound' system, and then you went into a project build sequence for video screens installation in the headrests.

If you have 2nd row captains chairs, you could install a 10" sub in a custom enclosure between the captains chairs, and it does not have to be bolted to the floor. This way, with a quick disconnect speaker wire, you could move the sub enclosure anytime that you needed the space for something else, or temporarily relocate the sub enclosure to another area in the truck, as needed, with an extension speaker wire. AudioMobile makes excellent subs designed specifically for small enclosures, and I have one of these 10" subs in a sealed 1 cu. ft. enclosure, between the captains chairs. The AudioMobile sub is not a pancake design, but instead, uses a traditional cage design. (I am not in any way financially connected with AudioMobile. I just like their American made subs.)

Regarding keeping the Bose amp and installing aftermarket speakers in the doors, keep in mind that the Bose speakers are typically around 1-2 Ohms impedance, and most aftermarket door speakers are 4 Ohms impedance. This could impact the sound level, due to impedance mismatches between the amp and the speakers. It may not be a big issue for you, but I want to at least lay that out there for you. I ripped out the entire Bose system (I am not a fan of Bose systems, but that is just me, as their sound profile does not match my listening desires.), and I replaced it with aftermarket speakers and amps matched to each other from an impedance perspective.

The photo below is my sub enclosure. Please excuse the white dog hair, as my white German Shepherd loves to sit on the sub enclosure and look out the front windshield over my right shoulder, while we are on a 'ride'. Another member on this Forum designed a sub enclosure for this space which included cup holders built into the sub enclosure.

View attachment 350614

View attachment 350613

I wish you the best of outcomes on your sound system build project.
I have the rear bench, I also want to keep the stock appearance as much as possible. From experience a good system can be a serious thiefmagnet. The less they see when they look in the more likely they are to move along and look elsewhere.

I am also aware of impedance matching. In the early 90's we used to cheat the amp's by running the 4ohm subs in parallel. This was before 2ohm subs were even available! But thank you for the head's up. It'll be a bit before I get to that part. Lot's of scouring posts and wading through all the options. I tend to like pioneer speakers, when you get to the higher end one's they seem to be just a little bit clearer than other's in the same price range. Subs are such a different animal it'll be a while before I decide there.
 
Last edited:
OP
OP
Monkey_Wrench

Monkey_Wrench

TYF Newbie
Joined
Sep 15, 2021
Posts
19
Reaction score
16
Next up is installing the new deck. I went with the Kenwood DNX997r. One reason is because it was one of the few even available right now, but aside from that, I'm a longtime fan of Garmin navigation. I've owned several of their windshield mounted units, and have been looking at the 3d terrain/off-road version. At around $700 for just that seemed steep, when you factor that into the high price of the 997r it started making more sense. The wireless mirroring is another reason, mainly because my phone doesn't connect well through USB. Any movement and it's disconnected. I also like that it can play DVDs for when I'm outside of cell phone coverage.

On to the install:
IMG_20210921_144755008.jpg
First thing I like to do is take all the wires one by one and make sure I know what they are and where they need to connect to each other, sometimes colors are similar but don't quite match (more on that in a few pics) so it helps to be sure before you start splicing.

IMG_20210921_145846250.jpg
Have to remember to put a piece of heat shrink tubing on first. I find it's most efficient to break it down to tasks, ie. cut a bunch of tubing, then put one on all the wires, then connect wires. It's easy to forget a step when you're doing everything on each wire then moving to the next.

IMG_20210921_150012981.jpg
I do like to splice wires a little different than just twisting them together, first I cross them, then continue twisting them around each other.

IMG_20210921_150103777.jpg
Will end up looking something like this. Try to press down the stray strands so they don't get stuck on the tubing.

IMG_20210921_151550159.jpg
This is what I meant by the colors not always quite matching. The green in the foreground is a speaker wire, the two in the back are "light green" and for the steering wheel controls. Don't want to mix them up.
 
OP
OP
Monkey_Wrench

Monkey_Wrench

TYF Newbie
Joined
Sep 15, 2021
Posts
19
Reaction score
16
IMG_20210921_152200086.jpg
Some of the wires are a lot longer than the others and are coiled up, instead of cutting them down, or stretching them out I just left them the way they are. It'll be handy if you want to sell it later on or install it in something different that needs the extra reach, and will still keep in neater in the dash.

IMG_20210921_152340640.jpg
Where three or more wires come together, I will twist two on one side then make my "pigtail" (I know technically that's something else, I just call it that because it coils around like a pig's tail).

IMG_20210921_152445317.jpg
Thusly

IMG_20210921_152507602.jpg
Now, because this has bigger wires you want to use a bigger size/color tube. Would also need to use a bigger one with multiple wires. It should barely fit over the pigtail. Another reason I like to use this kind of connection is it keeps the wires going in a straight line, makes it easier to put in the dash or pull through somewhere if you need it to. I've also done this without soldering and had good contact. If you tug ******* it it'll come undone, but most things don't need to bear weight. If I wasn't soldering them I'd have exposed about twice as much wire to be sure and get two or three wraps around.

IMG_20210921_152803866.jpg
I took the wires I won't be using and taped them together. The power antenna can be used to turn an amp on, and I most likely will be using it at a later date, so I may connect something to it so I can access it easily when I need it. Also worth noting, get good electrical tape. It's worth the extra expense. You can identify it by the labeling in side the roll. This one is UL listed. 3M makes good tape. The problem with the cheap stuff that is usually unmarked is it tends to be stiff and inelastic, with goopy glue that gets all over and doesn't stick for long. The good stuff you stretch is slightly as you put it on. It stays tight, seals it and sticks together far longer.
 
OP
OP
Monkey_Wrench

Monkey_Wrench

TYF Newbie
Joined
Sep 15, 2021
Posts
19
Reaction score
16
IMG_20210921_152807143.jpg
Keep track of these little guys so you don't end up in divorce court!

IMG_20210921_152937241.jpg
Helps if you can get a grip

IMG_20210921_154048682.jpg
Doesn't have to be the prettiest, it'll be covered by tubing and hidden away behind paneling.

IMG_20210921_155559360.jpg
I just put the tubing over the splice and run the soldering gun over it to shrink it up. Don't want to hold it over it too long or it'll melt it. Just enough to get it snug

IMG_20210921_162312756.jpg
All splices done. Will wrap tape around to organize it and keep it from being a "rat's nest". As long as the connections are good it'll work that way, but it's easier to tuck away if it neat wrapped up, it also won't be as likely to get snagged on anything.

So that's it for the wiring. Out to the garage next for the fun part!
 
OP
OP
Monkey_Wrench

Monkey_Wrench

TYF Newbie
Joined
Sep 15, 2021
Posts
19
Reaction score
16
I am not seeing the Chime GMOS module, are you going to run without it?
It's a plug in, but my factory chime worked without it, so no I'm not going to use it.

I have a few more pics, but really it was an 8hr+ thrash in the middle of the night and this afternoon to get it all done so I didn't get anywhere near as many as I'd have liked.
 
OP
OP
Monkey_Wrench

Monkey_Wrench

TYF Newbie
Joined
Sep 15, 2021
Posts
19
Reaction score
16
IMG_20210921_235414344.jpg
Always a good idea to function check before getting things too far in place. Took this pic around 11:30pm

IMG_20210922_013251270.jpg
The key to any clean install is absolute organization. This was around 4-4:30am. It was around this point I discovered the installation kit came with two left side panels for attaching to the radio, so had to put off completion until they opened in the later morning.

IMG_20210922_163154535.jpg

After a bit of rest I got up at the crack of noon got the kit exchanged and got back at it. This was 4:30pm. "What do you mean it took you over 8 hours to put in a stereo!?"
 

Attachments

  • IMG_20210922_000525923.jpg
    IMG_20210922_000525923.jpg
    226.7 KB · Views: 2
  • IMG_20210922_013251270.jpg
    IMG_20210922_013251270.jpg
    238.9 KB · Views: 2

Forum statistics

Threads
129,174
Posts
1,811,648
Members
92,268
Latest member
willie110hh
Top