foreverfalcon40
Full Access Member
- Joined
- May 3, 2009
- Posts
- 2,082
- Reaction score
- 4
I do have pics...but my camera has been barrowd for other duties. Will be on tonight.
Tools Needed:
1) Wire Cutters
2)Electric Tape
3) Female and Male Connectors (Optional)
4) Crimps (Optional)
5) Razor Blade
6) Drill and Bit
7) Gauge Itself
8) Gauge Pod
9) Screws
10) Pencil
11) C- Connecter (for grounding Guage) Optional
12) Extra Wire
13) Butt Connectors (Optional)
14) Razor Blade
NOTE: There are many ways you can connect two wires
1) Sottering
2) Stipping each side and using Butt Connectors and Using Crimpers
3) Stripping Each side and Using Male and Female Connector on each wire and Connect and of course Crimp the M/F connectors to that wire.
4) Just Strip ease connecter and Intertwine them together so there joined. THEN YOU MUST Wrape the wires in electrical tape so they are not exsposed. I don't recommend except when splicing into other wires). But its your project you do what you want!
I will put a * where you pick on of these methods to connect wires.
Installation:
1) Figure out where you want to mount up your Gauge Pod. Once you do mark top and bottom of where you want to mount it with a PENCIL (b/c you can erase after).
2) I installed it in my Driver's Side Pillar so we have to start with the removal of it. YOU DO NEED TO UNSCREW ANYTHING. I started at the top. It connects to the other pillar. Separate the Pillar from the other one and start to pull out and work your way down at the same time. Theres 3 Clips that hold the Pillar to the Body. One is at the very top. The other one in right after the curve on the door and the last one is at the bottom. WHEN YOU REMOVE PILLAR PULL DOWN ON BOTHE SIDES, so you don't snap the pillar.
3) Take your Pillar and re-allign the Pod to the to the lines your drew. You can tape it down to make sure it doesn't move while you Screw it in. 1 Screw on Each Corner.
4) Once Pod is mounted to the Pillar turn the pillar upside down so you see the reverse side of the pillar where the clips are. USE COMMON sense to figure where the Pod and Pillar are. Drill a Hole DEAD CENTER where the two are. So you can run your wires behind the pillar adding for a CLEAN INSTALL.
5) Since you still have your drill in your Position yourself underneath the dash next to seat so you can drill through the Firewall into the Engine Bay. Need to do this so you can run your PURPLE WIRE to the PCM.
Engine Bay shot.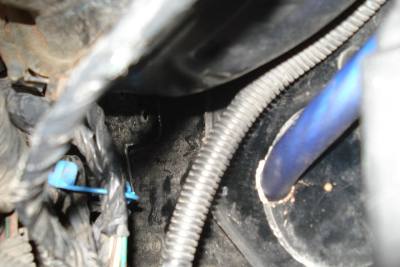
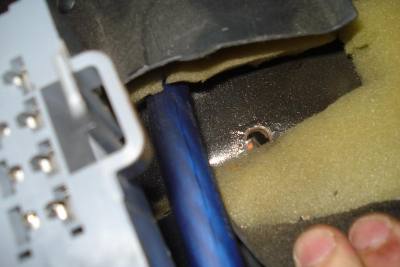
Interior Shot:
6) The Purple Wire IS NOT LONG ENOUGH TO RUN to the PCM so you will have to ADD WIRE. Any wire will do/any color. Stip each end of the Purple wire and the Extra Wire. Twist the ends so They are intertwined and less Flimsy. JOIN THE WIRES *.
7) Now Install Gauge into the Pod just slips right in. Make sure wires go thru first! I couldn't fit the installtion Cup to make sure the Gauge stays tight so i didn't use it. After 60miles of driving it didn't even move. I drive my Escahoe like a lady always very few occassions I throw on the heels and ***** her out.
8) Now lets Locate your PCM. Its right under the hood on the Drivers hand Side. ITS BIG, BLACK.....SICK *****...BOX! There are 4 connectors. All Labeled. YOU need the one labeled BLUE. Push down on the clamp and So it releases from the PCM. You should see a bunch of wires don't be scared. If you look closely you will see three notches through out the Plug just disconnect those to exspose the harness. Look for the PURPLE WIRE its number 19. JUST LOOK AT THE DAMM PIC. Splice into that. Use your razor blade. Use the Razor Blade on the Wire Once you feel wire sTOP and start to Move around the wire. YOU DONT have to do the full circle. Now move not to far and repeat. Then cut from one circle to the next in a straight line. PUT THE RAZOR BLADE DOWN. Then just peel off the wire.
PCM (In engine Bay on Driver's Sides side):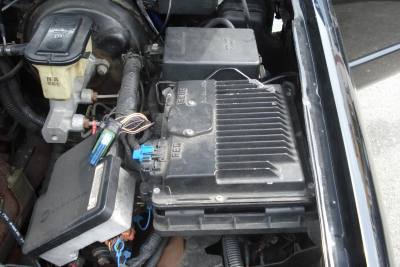
BLUE HARNESS: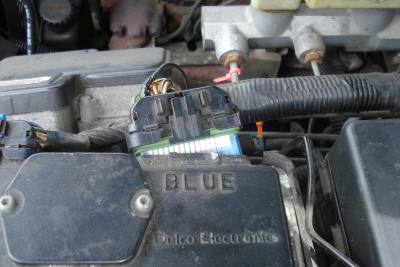
Side note: MY B&M Shift Kit as I installed (Hid it) underneath my PCM:
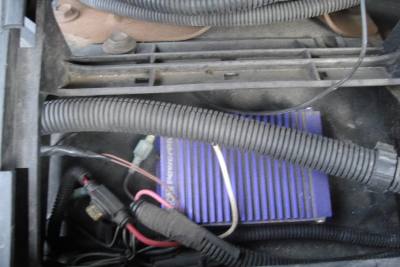
Here is a shot of the Opening of the PCM Harness: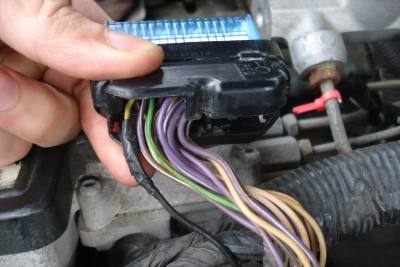
Purple Wire #19: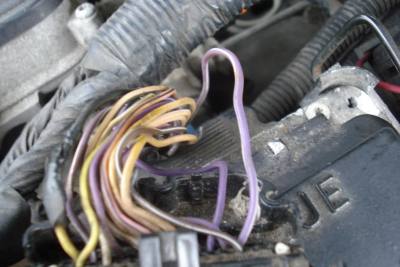
Splice: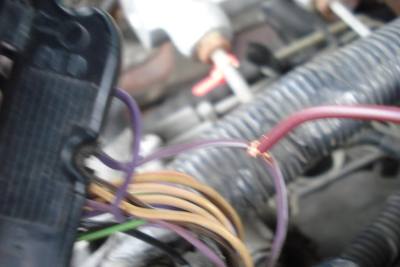
Wrap it up! REMINDER PLEASE WRAPED THE SPLICE WIRE BEFORE YOU WRAP ALL THE WIRES TOGETHER AGAIN!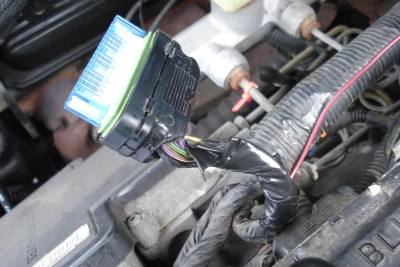
9) Drop you purple wire behind the dash. Best to just stick down the back of the dash board. The position yourself under the dash again. Pull the wire down and run it through the hole you drilled. GET up and back under the hood. Pull the wire thru and Connect it to exsposed part of the wire and Wrap it around. Take your electrical tape and cover it up. MAKE SURE YOU CAN'T SEE ANY EXSPOSED WIRE! Now its time to wrap it back up. Move all the wires to the one side like it was and close the Plastic Clasp around the harness and plug it back into the PCM.
OPTIONAL BUT RECOMMENDED
10) In order to make this a clean install ITS TIME TO HIDE THE WIRE! As you see there is this BIG...BLACK...SICK *****...Plastic tubing. On this tubing is a black plastic clamp. Un Clamp it and run the red wire Underneath the tubing through the clamp. Clamp it back up so the wire is held in place.
This the BBB Plastic Tubing that I ran Underneath.
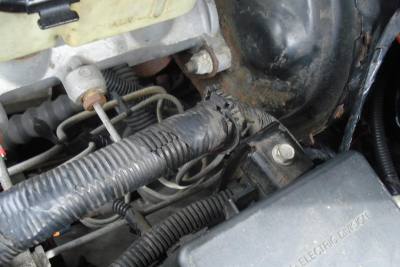
BACK TO NOT OPTIONAL
11) Now you need to run your ground. I did just bolt it to a exsposed rail on the bottom of the dash. YOU will do the same. Just strip the end of the wire and clamp it to the C Clamp. If you dont have a C-Clamp just strip the wire. Twist it and turn it into a hook. Then attach hook to screw and tighten it down.
12) Now its time to hook up the Power (RED) and White (Illumination). NEW AUTOMETER Gauges don't even have the white anymore. They combined it with the RED. SO just Join those two wires together.
13) Pull out your Dash Cover and look behind your Headlight switch. Find the Yellow Wire. Splice the Power Wire (Red/White joined together) to the YELLOW wire. Electrical tape it up and Put Dash cover back in.
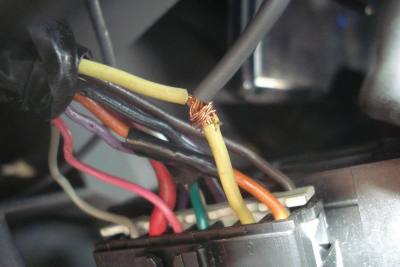
14) Once you hooked up all these wires, turn on your lights and start you HOE....WATCH THE LIGHT SHOW BABY. Give it some GAS AND MAKE HER DANCE!
15) Tuck the wire behind the pillar and re-install the pillar.
DONE...DRIVE...ENJOY...
KEEP MODDIN!


---------- Post added at 10:02 PM ---------- Previous post was at 09:49 PM ----------
This is my first write-up of many
Questions, comments, concerns?! Please.
Bump for Sticking this!
Tools Needed:
1) Wire Cutters
2)Electric Tape
3) Female and Male Connectors (Optional)
4) Crimps (Optional)
5) Razor Blade
6) Drill and Bit
7) Gauge Itself
8) Gauge Pod
9) Screws
10) Pencil
11) C- Connecter (for grounding Guage) Optional
12) Extra Wire
13) Butt Connectors (Optional)
14) Razor Blade
NOTE: There are many ways you can connect two wires
1) Sottering
2) Stipping each side and using Butt Connectors and Using Crimpers
3) Stripping Each side and Using Male and Female Connector on each wire and Connect and of course Crimp the M/F connectors to that wire.
4) Just Strip ease connecter and Intertwine them together so there joined. THEN YOU MUST Wrape the wires in electrical tape so they are not exsposed. I don't recommend except when splicing into other wires). But its your project you do what you want!
I will put a * where you pick on of these methods to connect wires.
Installation:
1) Figure out where you want to mount up your Gauge Pod. Once you do mark top and bottom of where you want to mount it with a PENCIL (b/c you can erase after).
2) I installed it in my Driver's Side Pillar so we have to start with the removal of it. YOU DO NEED TO UNSCREW ANYTHING. I started at the top. It connects to the other pillar. Separate the Pillar from the other one and start to pull out and work your way down at the same time. Theres 3 Clips that hold the Pillar to the Body. One is at the very top. The other one in right after the curve on the door and the last one is at the bottom. WHEN YOU REMOVE PILLAR PULL DOWN ON BOTHE SIDES, so you don't snap the pillar.
3) Take your Pillar and re-allign the Pod to the to the lines your drew. You can tape it down to make sure it doesn't move while you Screw it in. 1 Screw on Each Corner.
4) Once Pod is mounted to the Pillar turn the pillar upside down so you see the reverse side of the pillar where the clips are. USE COMMON sense to figure where the Pod and Pillar are. Drill a Hole DEAD CENTER where the two are. So you can run your wires behind the pillar adding for a CLEAN INSTALL.
5) Since you still have your drill in your Position yourself underneath the dash next to seat so you can drill through the Firewall into the Engine Bay. Need to do this so you can run your PURPLE WIRE to the PCM.
Engine Bay shot.


Interior Shot:
6) The Purple Wire IS NOT LONG ENOUGH TO RUN to the PCM so you will have to ADD WIRE. Any wire will do/any color. Stip each end of the Purple wire and the Extra Wire. Twist the ends so They are intertwined and less Flimsy. JOIN THE WIRES *.
7) Now Install Gauge into the Pod just slips right in. Make sure wires go thru first! I couldn't fit the installtion Cup to make sure the Gauge stays tight so i didn't use it. After 60miles of driving it didn't even move. I drive my Escahoe like a lady always very few occassions I throw on the heels and ***** her out.
8) Now lets Locate your PCM. Its right under the hood on the Drivers hand Side. ITS BIG, BLACK.....SICK *****...BOX! There are 4 connectors. All Labeled. YOU need the one labeled BLUE. Push down on the clamp and So it releases from the PCM. You should see a bunch of wires don't be scared. If you look closely you will see three notches through out the Plug just disconnect those to exspose the harness. Look for the PURPLE WIRE its number 19. JUST LOOK AT THE DAMM PIC. Splice into that. Use your razor blade. Use the Razor Blade on the Wire Once you feel wire sTOP and start to Move around the wire. YOU DONT have to do the full circle. Now move not to far and repeat. Then cut from one circle to the next in a straight line. PUT THE RAZOR BLADE DOWN. Then just peel off the wire.
PCM (In engine Bay on Driver's Sides side):

BLUE HARNESS:

Side note: MY B&M Shift Kit as I installed (Hid it) underneath my PCM:

Here is a shot of the Opening of the PCM Harness:

Purple Wire #19:

Splice:

Wrap it up! REMINDER PLEASE WRAPED THE SPLICE WIRE BEFORE YOU WRAP ALL THE WIRES TOGETHER AGAIN!

9) Drop you purple wire behind the dash. Best to just stick down the back of the dash board. The position yourself under the dash again. Pull the wire down and run it through the hole you drilled. GET up and back under the hood. Pull the wire thru and Connect it to exsposed part of the wire and Wrap it around. Take your electrical tape and cover it up. MAKE SURE YOU CAN'T SEE ANY EXSPOSED WIRE! Now its time to wrap it back up. Move all the wires to the one side like it was and close the Plastic Clasp around the harness and plug it back into the PCM.
OPTIONAL BUT RECOMMENDED
10) In order to make this a clean install ITS TIME TO HIDE THE WIRE! As you see there is this BIG...BLACK...SICK *****...Plastic tubing. On this tubing is a black plastic clamp. Un Clamp it and run the red wire Underneath the tubing through the clamp. Clamp it back up so the wire is held in place.
This the BBB Plastic Tubing that I ran Underneath.

BACK TO NOT OPTIONAL
11) Now you need to run your ground. I did just bolt it to a exsposed rail on the bottom of the dash. YOU will do the same. Just strip the end of the wire and clamp it to the C Clamp. If you dont have a C-Clamp just strip the wire. Twist it and turn it into a hook. Then attach hook to screw and tighten it down.
12) Now its time to hook up the Power (RED) and White (Illumination). NEW AUTOMETER Gauges don't even have the white anymore. They combined it with the RED. SO just Join those two wires together.
13) Pull out your Dash Cover and look behind your Headlight switch. Find the Yellow Wire. Splice the Power Wire (Red/White joined together) to the YELLOW wire. Electrical tape it up and Put Dash cover back in.

14) Once you hooked up all these wires, turn on your lights and start you HOE....WATCH THE LIGHT SHOW BABY. Give it some GAS AND MAKE HER DANCE!
15) Tuck the wire behind the pillar and re-install the pillar.
DONE...DRIVE...ENJOY...
KEEP MODDIN!


---------- Post added at 10:02 PM ---------- Previous post was at 09:49 PM ----------
This is my first write-up of many
Questions, comments, concerns?! Please.
Bump for Sticking this!
Last edited:

