First post! 2002 z71, original owner, modified to be my road-life-warrior vehicle

Disclaimer: Links on this page pointing to Amazon, eBay and other sites may include affiliate code. If you click them and make a purchase, we may earn a small commission.

jeffm333

TYF Newbie
Joined
May 25, 2021
Posts
22
Reaction score
38
Location
Tennessee & Nevada mostly
Greetings! Over the last ~19 years I've read bits and pieces from this and other forums whenever I needed help with anything on my 2002 Z71. ~285k miles. Original engine, original transmission, original owner. Over the last decade plus it has been a secondary vehicle that I mostly use for extended road trips & road living. It's seen all the states but Hawaii and fair chunk of western Canada. I've experimented with setting it up a handful of ways to accommodate being out on the road for months at a time (off-road and off-grid when possible :) ).

Currently have the back seats and some things removed for a custom platform & cabinet storage setup. Includes a three-battery setup, 12-VAC inverter, upgraded alternator, 12v cooler/fridge, storage space for ski's/snowboards/backpacking & camping gear, fishing gear, a mounted safe for laptops/firearms/valuables, etc. I'm surely forgetting some things and over time I always seem to tear down something to build or try out something new. Investigating some suspension improvement options now that Ill likely post about soon.

I keep saying that as I get older I'll switch to a sprinter van or RV or some other more comfortable road-life vehicle... but for now the minimalist-ish approach with the Tahoe just affords me the ability to be able to tackle remote areas only accessible with a 4x4 vehicle... and I can't bring myself to give that up.

If anyone has similar interests as a weekend outdoor warrior with their Tahoe/Yukon and want to share ideas or have any questions just ping me!

Jeff
 

Bill 1960

Testing the Limits
Joined
Dec 17, 2020
Posts
1,480
Reaction score
2,857
Welcome! I have mine set up for a somewhat similar use although we don’t often camp out of the vehicle. More of a day trip use for us; we spend the nights at base camp in our RV.
 

Miami-Dade

Staff member
Super Moderator
Supporting Member
Joined
Dec 8, 2016
Posts
3,667
Reaction score
4,330
Welcome from Miami Beach Jeff! Hear you on can't bring myself to give that up.
 

Joseph Garcia

Supporting Member
Joined
Aug 2, 2018
Posts
6,509
Reaction score
8,505
Welcome to the Forum from NH.

Lots of knowledgeable folks here who freely share their knowledge, experiences, and perspectives. Knowledge is power.

I hope that you will become a participating member in the Forum's discussions.

Pics, please.
 
OP
OP
jeffm333

jeffm333

TYF Newbie
Joined
May 25, 2021
Posts
22
Reaction score
38
Location
Tennessee & Nevada mostly
Pics you say? :)

Not sure if this is the best spot or better to start another thread for Tahoe-overlanders... but I snapped a couple today (forgive the dust I've mostly been out on the road since February)... and found a couple from the last build effort. Keep in mind this has been an evolution over a long time so even the wierd or nonsensical stuff has some reason behind it. (even if it is a bad reason). Also I'm not a seasoned mechanic or woodworker by any means... I'm an old electrical engineer/tech guy that hasn't done any real electrical engineering in decades... but is handy and likes doing stuff myself when I can. This Tahoe was my primary driver for the first 8 or 9 years of its life, and the last decade it has primarily been my road-warrior vehicle. Sometimes for a weekend, sometimes for months on end. If you have any questions or suggestions just hit me up.


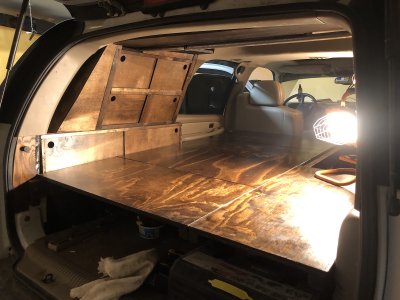
IMG_0849 2.JPG

This one was during the last platform build out so it isn't complete, but has good lighting and shows the basic structure of the platform and the drivers side cabinets. Yes, this platform is too high for most people (me included)... but the goal was to fit a fully packed snowboard bag with gear under it, and a full length plastic tub to hold the gear when wet. It isn't exactly modular per se... but I built the platform so I could make some cuts and adjustments in the future if I wanted to change it, or lower it or remove the lefthand side altogether if desired. The platform top is 4 individual boards that can be lifted from the inside to get access to gear underneath... but in practicality it is quite the pain in the ass to do from inside the closed vehicle with sleeping pads/bags on top :). The Cabinetry that is on the passenger side wasn't built yet in this pic; will show in another.


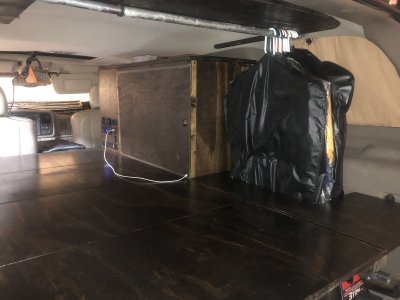
IMG_0928 2.JPG
Here is a pic from the back looking towards the passenger side after the cabinetry and "closet" were more or less complete. The closet hanging rod doubles as a support for an upper shelf along the back. Behind the hanging clothes are now a shelving system with bungee-strap fronts to secure random items. I wanted to put cabinetry over here as well but was running out of time before I had committed to get on the road to meet people for ski/snowboard trips this year.

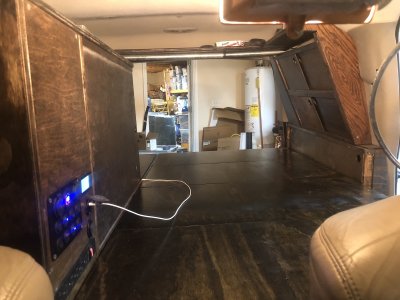
IMG_0932 2.JPG

Here is a view from the driver/passenger area into the back of the truck near the end of the build. You can see the upper shelf a bit better from here.


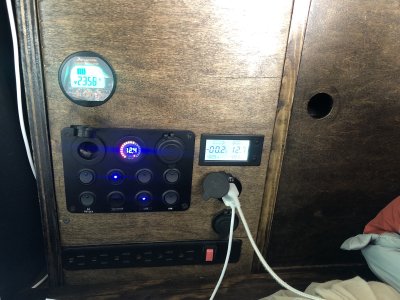
IMG_2796 2.JPG

Here's a close up taken today of the main electrical panel in the rear. 120VAC from the inverter installed up under where the console is, voltmeters and/or ammeters for all three batteries, switches control the USB ports and 12v power outlets seen on the panel as well as USB ports near the front and back windows for fans and also for the cooling fans I have on the electrical box holding the Lithium Ion battery and the DC/DC converter.


IMG_2797 2.JPG

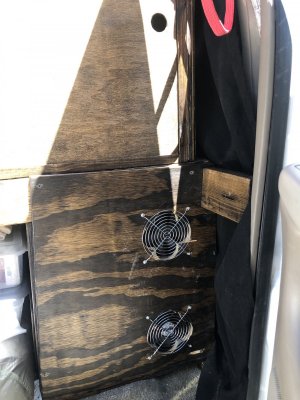
Also taken today... Not much to see here, but this is the view into the vehicle from the back passenger side door. Basically just gives access to the cabinetry and storage, and you can see the cooling fans on the box where the Lithium Ion battery, DC/DC converter, plus some other control switches/fuses/circuit breakers live. You can access the box vie opening the cabinet door and lifting the lid, but I was too lazy to unpack stuff and try to get a pic into it. I probably have one from the build I can post later. (Ignore the ugly-install holes for the fans... this was an addition done on the road as I was concerned about the heat the DC/DC charger was putting out when it was working har to charge the battery... unfortunately I didn't have a jigsaw or a hole saw appropriate so I had to improvise. :) )
 
OP
OP
jeffm333

jeffm333

TYF Newbie
Joined
May 25, 2021
Posts
22
Reaction score
38
Location
Tennessee & Nevada mostly
And a little more....

IMG_2802 2.JPG
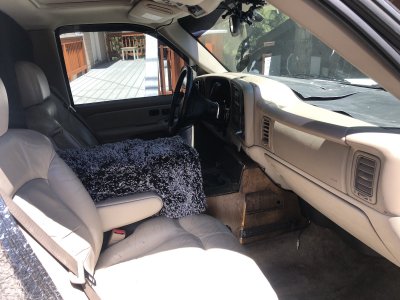
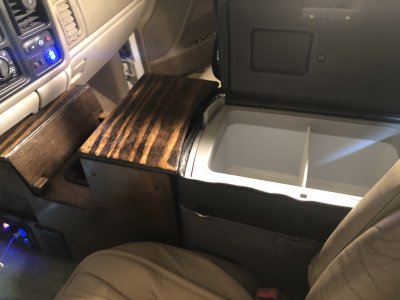
Pic snapped today. I have others that will show the console and fridge better I can find and post later; this shows the cheesy but super-soft and extra insulation-providing fake badger fur covering that I keep over the fridge and the rear part of the custom console. The console is a whole interesting story in itself maybe I can save for it's own post. The short version is I wanted something to house the inverter plus my nerdy electronics, plus add some extra space for storage since I was giving up a bunch from the original console by installing the Dometic 12v fridge/freezer/cooler. I built a flimsy mock-up of cardboard first, then decided to build a mock-up using mostly scrap wood I had to figure out the fit and what I'd like, then go back with quality wood and precise plans to build the final product. Well, the wood mockup took SO long to get right through trial & error cutting/shaping/stuffing/jamming... that once I got it basically right, I had had enough of building consoles and decided to just stain it and let it be the first trial console. It's actually working out well still but ultimately I'd like to do something nicer.


IMG_2794 2.JPG

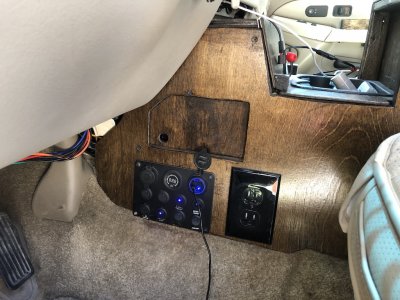
Here is the view of the console from the drivers side. Shows the main front electrical control panel, which controls power to the fridge, the inverter, and all the USB ports and 12V outlets on both sides of the console. COntrols another voltmeter for the starter battery, and controls the voltmeter I put in the dash showing the starter battery and the secondary optima battery I have under the hood. Sliding door accesses storage (also accesible from passenger side) that I generally keep a USB hub and drives and other misc computer stuff in. (I built a makeshift removable desktop that fits on the passenger side so I have a working desk/office of sort for my nerd-activities, and I can just plug the USB hub into the computer from here)

IMG_2795 2.JPG

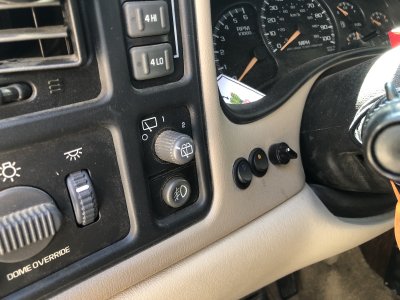
Quick shot of the added switches to the dash. These allow me to manually control connecting the main "house" battery (the Lithium Ion in the back) and the secondary optima battery under the hood to the alternator. (When vehicle is running I can control when they are charging and when they are not. I wanted to be able to do this initially because I had the stock alternator still, and I wasn't expecting it to charge all of these batteries without voltage drop and other issues. I have since installed an upgraded output alternator that can handle it, but I do still like having control over when I'm charging and when I'm not). The evolution of the battery and electrical system was over time so there are a few things that are weird or non-standard; if anyone has interest in extremely nerdy but capable electrical systems in their Tahoe overlander, let me know, I've learned some lessons. :)

IMG_2805 2.JPG
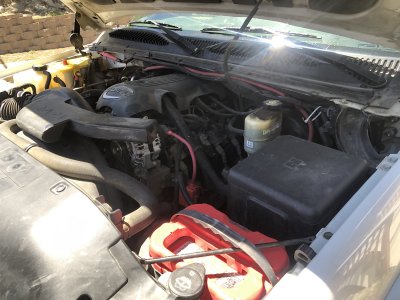
Quick shot under the hood today. Not much different from a stock tahoe/suburban/yukon beyond that shiny alternator and the optima red top starter battery and the yellow top optima battery you see in the far passenger side corner. (Initially I just installed the optima yellow top as my second "house" battery, and didn't have the lithium ion setup. This was great before I got the fridge and wanted to be off-grid longer... the optima yellow top is what I call a "hybrid" between a deep cycle and a traditional starter battery. It will still reliably start the vehicle without being significantly detrimental to the battery, but it also is a 50 or 55Ah deep-cycle battery with longer life when powering your off-grid peripherals. This set up made sure I didn't get stranded in wilderness unable to start the car, it powered all my electronics, and even powered the fridge for a day or two before needing to be charged... but ultimately my desires to be offgrid longer with power and eventually add a portable solar solution required I move to the third true deep cycle house battery. Not pictured are the negative terminal kill switches I put on both batteries (super helpful during maintenance or troubleshooting anything where you want the battery disconnected). Also can's see the fuse or battery isolator for the yellow top battery.

IMG_0853 2.JPG

Here is a shot of the console and fridge open without the sexy fake fur. Can also see the different lids/compartments on the console and the dual voltmeter, audio jack, and indicator light mods on the dash. (The weird square blocks on the front compartment of the console are strategically size to where my tablet will fit there upright which I use for storing tons of topographical maps, maps showing BLM/NF/Public and private lands, etc. Very useful with GPS when traversing unknown offroad areas.
 
OP
OP
jeffm333

jeffm333

TYF Newbie
Joined
May 25, 2021
Posts
22
Reaction score
38
Location
Tennessee & Nevada mostly
Enough for now... I did find a handful of pics from the recent build I will hav eto organize and resize to be able to post. If anyone has special interest in a specific aspect of what I've done (battery system, electrical, platform, console, etc) I can start a thread just on that.

Oh, also don't judge me for the weird black dusty construction paper all over the dash. I have mounted an older gopro to the rear view mirror to act as a dash cam to record trips on the road, and the beige shiny plastic dash gives off a brutal glare when the sun is at certain angles. If any of you are photography/videography pro's and have a better solution for this please let me know. :)
 

Sparksalot

Supporting Member
Joined
Sep 20, 2020
Posts
5,185
Reaction score
14,263
Location
Bastrop County, Texas
Enough for now... I did find a handful of pics from the recent build I will hav eto organize and resize to be able to post. If anyone has special interest in a specific aspect of what I've done (battery system, electrical, platform, console, etc) I can start a thread just on that.

Oh, also don't judge me for the weird black dusty construction paper all over the dash. I have mounted an older gopro to the rear view mirror to act as a dash cam to record trips on the road, and the beige shiny plastic dash gives off a brutal glare when the sun is at certain angles. If any of you are photography/videography pro's and have a better solution for this please let me know. :)
I’ll be watching for the photo input as well. My rubber ducky reflects, I noticed my PA does too now.

92729320-6C1B-4B35-A14E-5FEECB1EC723.jpeg
 

Forum statistics

Threads
129,196
Posts
1,811,970
Members
92,297
Latest member
btheboyscout
Top