Building the SS(V) TrailHoe

Disclaimer: Links on this page pointing to Amazon, eBay and other sites may include affiliate code. If you click them and make a purchase, we may earn a small commission.

OP
OP
B

Bill 1960

Testing the Limits
Joined
Dec 17, 2020
Posts
1,480
Reaction score
2,857
1829CA7B-6138-488F-B1D8-918BB65851CB.jpeg Got the side steps/ rails put on. Lightweight, but good enough for my needs in the short term until I get time to build my own.

These are APS Truck Armor Side Steps. PN is APS-IA03SAC1B

DF1150CC-DEF4-41F8-B99A-B0509E97FC76.jpeg
 
OP
OP
B

Bill 1960

Testing the Limits
Joined
Dec 17, 2020
Posts
1,480
Reaction score
2,857
I’d love to see how those are mounted.

I also noticed they have gone up in price.
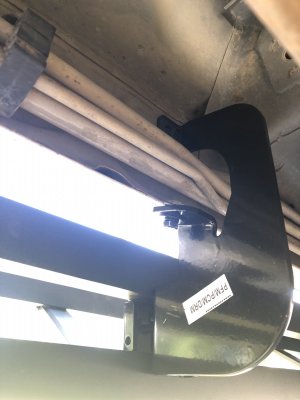
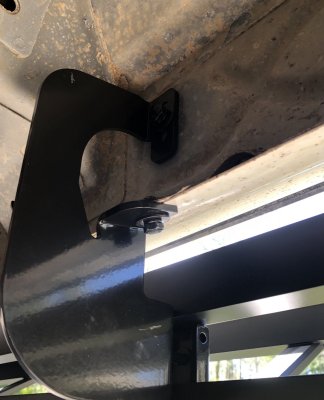
I’ll add a shot from underneath tomorrow. They’re mounted to the factory running board mounting points. There’s a bunch of threaded holes already in place along the pinch weld and above it. No drilling required, and the brackets are carved out to fit around the heating and cooling lines under the passenger side.

Here you go:

C46D300E-7EEF-4F2B-968C-6630770A3C51.jpeg 0AB3D896-B9A1-4992-8CD4-0AEDEED76B18.jpeg
 
Last edited:
OP
OP
B

Bill 1960

Testing the Limits
Joined
Dec 17, 2020
Posts
1,480
Reaction score
2,857
Rear diff oil change. I hate paper gaskets! If I valued my time at even half of commercial rates I’d throw the old cover in the scrap metal and use a new one to save time.

It goes back together with the Lube Locker gasket from post 100.

DD8FC359-EEA0-4E28-9913-1C32989110CA.jpeg 781575A7-7305-4D9B-B41A-1CE049F4FD57.jpeg
 

Sparksalot

Supporting Member
Joined
Sep 20, 2020
Posts
5,188
Reaction score
14,271
Location
Bastrop County, Texas
I’ll add a shot from underneath tomorrow. They’re mounted to the factory running board mounting points. There’s a bunch of threaded holes already in place along the pinch weld and above it. No drilling required, and the brackets are carved out to fit around the heating and cooling lines under the passenger side.

Here you go:

View attachment 274522 View attachment 274523
Thanks for the pics. That helps envision them a lot.
 
OP
OP
B

Bill 1960

Testing the Limits
Joined
Dec 17, 2020
Posts
1,480
Reaction score
2,857
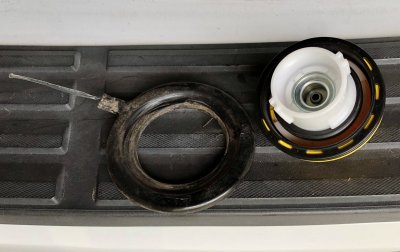
Near the bottom of my maintenance list has been dealing with an intermittent evaporative emissions codes. I believe I got lucky and found the culprit today while replacing the missing tire tools and jack.

The wiring for the Fuelmaster passed through that compartment so I decided to remove the rest of the cables. When I got to the fuel filler I realized that what looked like a rubber gasket around the filler neck was actually the Fuelmaster antenna, and it was positioned such that it was between the sealing surfaces of the gas cap and the filler neck. It was a bit misshapen. So I’m hopeful this bit of legacy government hardware was the source of my vapor leak.

I know some others out there have found the Fuelmaster hardware on their retired PPV/SSV.
590D42C8-0259-421A-AE7A-BBA674665B73.jpeg

For the majority that haven’t seen these gadgets, it’s an electronic device with an OBD2 connection and a transducer antenna on the fuel filler. The purpose is to automatically record the vehicle ID and odometer at the government fuel depot. Presumably it also serves to activate the fuel dispenser so only authorized vehicles can fill up.
 
Last edited:
OP
OP
B

Bill 1960

Testing the Limits
Joined
Dec 17, 2020
Posts
1,480
Reaction score
2,857
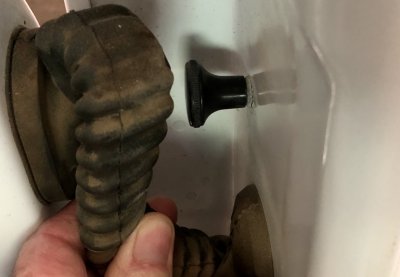
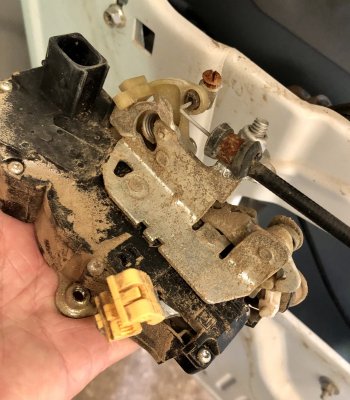
Here’s what was done on mine to alter the rear door locks. The rods connecting the rear lock button to the lock were removed, and they replaced that mechanical lock function with a pull cable run to a knob on the front of the door. Hidden in there by the B pillar. And the electric lock harness was just unplugged from the lock.

04FD24CF-32F5-4062-80AC-A29D2D7CFAF7.jpeg DB2A700C-9F31-4D77-BBE1-708691F9BC3B.jpeg
 
OP
OP
B

Bill 1960

Testing the Limits
Joined
Dec 17, 2020
Posts
1,480
Reaction score
2,857
This shows how the rear window switches were disabled. Tape covering the switch contacts. To remove it, just carefully unsnap all the layers of the switch assembly. I used electrical contact cleaner and a small cloth to remove adhesive from the contact surfaces marked SW1 and SW2.

4758251D-97A2-48B3-B4D0-D8AD67944023.jpeg 4BD31448-9147-4EC9-AAC5-C84E0D8772FD.jpeg ADB29DF3-42BF-4404-AA94-BACA7DAA0B53.jpeg
 
Top