2022 Tahoe Rear Liftgate Applique Chrome Defect

Disclaimer: Links on this page pointing to Amazon, eBay and other sites may include affiliate code. If you click them and make a purchase, we may earn a small commission.

DocDoug

TYF Newbie
Joined
Jul 31, 2022
Posts
9
Reaction score
2
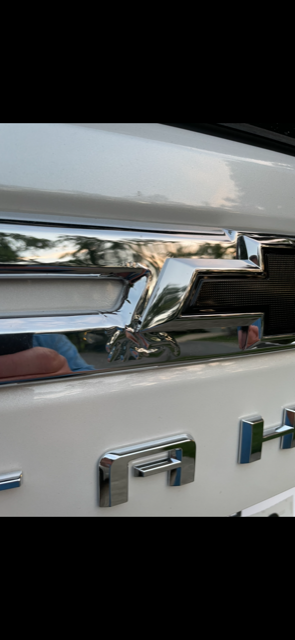
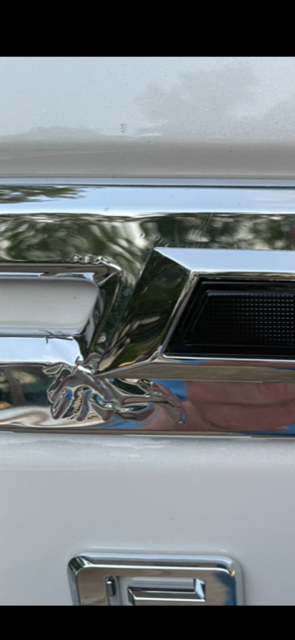
New 2022 Tahoe Premier delivered in June 2022 with a blemish on the rear chrome applique. (I waited nearly 8 months from order to delivery of the Tahoe.) The dealer ordered and subsequently mailed me a new trim piece that arrived this month (October). The dealer is 250 miles round-trip for me.

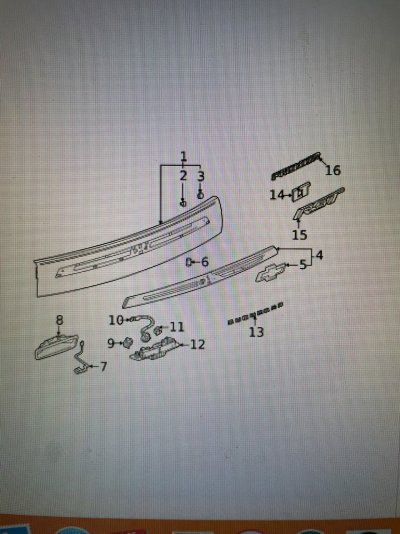
To avoid wasting a full day, cost of fuel and the dealership possibly scratching the paint during the replacement process, I thought that I would simply remove and replace the defective part. (I am no stranger to most any repair.) I believed the part could simply be lifted on the corner and manipulated off. (The part has 10 or so molded plastic push clips. I am afraid that simply pulling on the trim may damage the painted plastic base that it mounts to.) From my images, item number 4 needs to be replaced.

Short of removing the plastic interior lift-gate shell to access the rear of item number 1 to "push" out the plastic pins of item number 4, does anyone have experience with removing the applique (number 4)? Removing the lift-gate shell looks like an ordeal too, with the possibility of broken plastic.

I hate to spend 8 hours and $50.00 in fuel to swap out this part at the dealership and risk further damage to clips and paint.

Thank you! Doug
 

Attachments

  • thumbnail_IMG_8333.jpg
    thumbnail_IMG_8333.jpg
    458.9 KB · Views: 40
  • thumbnail_IMG_8331-1.png
    thumbnail_IMG_8331-1.png
    657.9 KB · Views: 37
  • thumbnail_IMG_8330-1.png
    thumbnail_IMG_8330-1.png
    1,014.8 KB · Views: 40
  • thumbnail_IMG_8334.png
    thumbnail_IMG_8334.png
    973 KB · Views: 33
Last edited:

Zmfrancik

TYF Newbie
Joined
Jan 18, 2023
Posts
18
Reaction score
14
How did you end up getting it off? I’m planning on swapping my chrome for the black chrome version next weekend.
 
OP
OP
D

DocDoug

TYF Newbie
Joined
Jul 31, 2022
Posts
9
Reaction score
2
HUGE job. You have to take the inside plastic cover off then unscrew the painted piece. Once you have that off, you have to cut the tabs off of the appliqué to remove it. Snap the new appliqué to the painted piece and the new bow-tie to the appliqué and screw the assembly to the hatch and reinstall the inside plastic cover. Make sure to have special plastic tools and use painters tape to cover the painted surfaces when removing the interior plastic cover.

I watched my dealership do the job. He knew what he was doing and it took him three hours to complete. It was VERY tight to remove and reinstall the nuts on the back of the painted piece assembly.

If you are on the Southern Eastern shore of Maryland, I can vouch for a particular dealership and employee that will do the job with great care. Otherwise, Good luck. You WILL need it!
 

Zmfrancik

TYF Newbie
Joined
Jan 18, 2023
Posts
18
Reaction score
14
Damn! I thought it was a 10 minute swap. This doesn’t sound like the right way, but it sounds like you could just snap off the appliqué by pulling it off the painted piece and breaking the tabs? Would save having to remove the interior panel. Does this sound like a terrible idea?
 
OP
OP
D

DocDoug

TYF Newbie
Joined
Jul 31, 2022
Posts
9
Reaction score
2
Damn! I thought it was a 10 minute swap. This doesn’t sound like the right way, but it sounds like you could just snap off the appliqué by pulling it off the painted piece and breaking the tabs? Would save having to remove the interior panel. Does this sound like a terrible idea?
When see how many snaps and how TIGHT they are to the painted piece, you will understand. I initially tried to pry a corner up and insert a flat long screw driver into the hole to release one of the many snaps and it became quite obvious to me that the only thing I was going to do was damage the painted piece with pry marks. I even used painters tape and cardboard to reduce the friction to the painted piece with no luck.

You could, once you have the replacement piece, use a Dremel type tool and cut / destroy the appliqué in the area of the snaps to remove it then simply just snap the new one in. I considered this BUT didn’t see a way to remove the dead snapped off pieces that would drop into the void and possibly cause me a nightmare of future vibrations for the life of the truck….
 

Zmfrancik

TYF Newbie
Joined
Jan 18, 2023
Posts
18
Reaction score
14
When see how many snaps and how TIGHT they are to the painted piece, you will understand. I initially tried to pry a corner up and insert a flat long screw driver into the hole to release one of the many snaps and it became quite obvious to me that the only thing I was going to do was damage the painted piece with pry marks. I even used painters tape and cardboard to reduce the friction to the painted piece with no luck.

You could, once you have the replacement piece, use a Dremel type tool and cut / destroy the appliqué in the area of the snaps to remove it then simply just snap the new one in. I considered this BUT didn’t see a way to remove the dead snapped off pieces that would drop into the void and possibly cause me a nightmare of future vibrations for the life of the truck….
That’s what I was thinking as soon as I replied. That broken plastic tabs would just be rattling away in the lift gate. I’m pretty handy, but I really had no intention of taking apart the interior to put this piece of plastic on. I guess I’ll just have the dealership do it at the first oil change.
 

Zmfrancik

TYF Newbie
Joined
Jan 18, 2023
Posts
18
Reaction score
14
Last question, do you know how the interior liftgate panel pops off to access the inside? Does it just pop off with some clips? I figured I’d ask before just pulling at it and breaking something.
 
OP
OP
D

DocDoug

TYF Newbie
Joined
Jul 31, 2022
Posts
9
Reaction score
2
It has the push “nail” plastic pieces. Make sure you use painters tape to protect the painted lift gate that it mounts to, when prying. The clips are tight and a fork clip tool would be best used to concentrate the leverage / pressure to the exact area of the clip. Don’t forget to remove the small screw / bolt where the locking mechanism is. This too holds the shell to the liftgate.

Finally, if you decide to have the dealership do the job, make sure they are competent with the 2021 and newer assemblies. My body shop guy, with 30 years experience, looked at it and said he wouldn’t touch it for fear of damaging the painted piece which would easily add $400.00 in parts and painting.

If you are successful in removing the interior plastic shell, that would clearly give you an idea what you would be up against.
 

Forum statistics

Threads
129,207
Posts
1,812,157
Members
92,307
Latest member
Goodlife_chevy
Top