damitchell
Member
- Joined
- Oct 7, 2016
- Posts
- 42
- Reaction score
- 16
Ok I was shocked to find out that there is NOT a cargo light on the 2016 Yukon Denali.
For example... the only light back there is between the second and 3rd row seat. If your outside of the vehicle looking through your cooler for a cold one... you can't reach that! If the 3rd row is up,,, you can't reach that.
If you are like me,,, I like to be able to pop the glass hatch,, get what I need and get out...
So I found a fix...
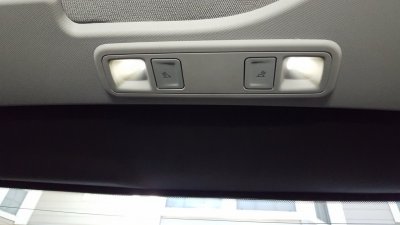
I went to the dealer and purchased the 2nd/3rd row overhead light. (two LED lights with buttons) with the idea of finding a way to install it in the rear.. either on the hatch, the sides or overhead. Cost was about $65.00
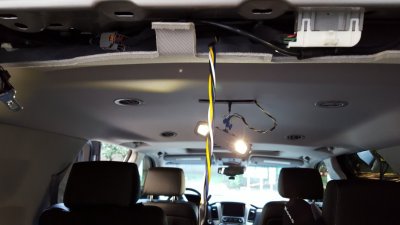
After weeks of thinking about it,, youtube searches,,, considerations ect.. I decided to just have a closer look at the rear to see where it could go. After pulling on some of the panels I found the best spot would be to fishtape a wire from the 2nd row light back to the rear and install overhead.
Tools:
panel remover tool (or flathead)
soldering iron
splice connectors
18 gage wire
16 gauge female connectors
shrink tube
heat gun/torch
Electrical tape
Dremel Tool
Razor Blade
Fish Tape
I would say this took me about 6 hours because I was figuring things out as I went.. but you should be able to do this in 3 hours.
Posted Pics!
Thank you GMC designers for forgetting this key need!
I am trying to put all of the pictures in order in an album but having a hard time organizing them. Here are a few pics...


For example... the only light back there is between the second and 3rd row seat. If your outside of the vehicle looking through your cooler for a cold one... you can't reach that! If the 3rd row is up,,, you can't reach that.
If you are like me,,, I like to be able to pop the glass hatch,, get what I need and get out...
So I found a fix...
I went to the dealer and purchased the 2nd/3rd row overhead light. (two LED lights with buttons) with the idea of finding a way to install it in the rear.. either on the hatch, the sides or overhead. Cost was about $65.00
After weeks of thinking about it,, youtube searches,,, considerations ect.. I decided to just have a closer look at the rear to see where it could go. After pulling on some of the panels I found the best spot would be to fishtape a wire from the 2nd row light back to the rear and install overhead.
Tools:
panel remover tool (or flathead)
soldering iron
splice connectors
18 gage wire
16 gauge female connectors
shrink tube
heat gun/torch
Electrical tape
Dremel Tool
Razor Blade
Fish Tape
- Go buy the 2nd/3rd row overhead light from your dealer. Take the bezel cover off and turn face down on some cardboard and trace the outline. note the edge extends a little more than the body of the light so you need to make your template a little smaller than your first outline. I measured in about 1/16 or so.. (eyeballed)
- set that all aside
- Now remove the existing 2nd/3rd row light.
- To do this you pry from the back of the light (hard) and that should remove the cover containing the buttons.
- then pry the light console body (black in color) from the roof... this was difficult as there are two silver metal tabs that ********* slots in the body of the roof. Don't be surprised if you break off a tab.. (that's why you will use this one in the rear and replace this with the new one you purchased). I even needed to use a flat head and pry from one end.
- disconnect the 4 wire connector that provides power.
- peal off black cloth like tape far enough to make room for splice connectors.
- Open hatch and start remove rear overhead panel by lifting rubber gasket a little and pry with fingers pulling down on the overhead panel. notice the red plastic tabs and their location and how they are holding the panel in place. Use panel removal tool or flat head to pry the red panel tabs away from vehicle body. Note that these have metal tips. If one comes off it could rattle around up there so if it does,, try a magnet or needle tips to extract it,, put back on the red tabs. fish out the seat belt on the left side and set the panel aside.
- Cut 4 pieces of 16-18 gauge wires about 6 feet in length and twist them together to form one.. tape every so often to hold together.
- Tape to a fish tape or fish rod and push through from rear towards the front of vehicle.
- Go to inside and pull the wire down with fingers.
- take splice connectors and crimp on each new wire to the existing overhead light consoles wires. Tip... start placing them about 1 inch away from the factory connector to leave room for you to reinstall the light overhead. you don't want those between the light and the car body.
- make note of the wire pattern on the factory connector and the pins on the light so you can match them for the new light install.
- Connect the factory wire connector to the light.
- Test the lights to see if they work.
- Leave the light hanging so you can use it to test as you go that light is still functional.
- Do not reinstall this light until the very last as you don't want to have to remove it again.
- go to the rear of the vehicle again and take your panel you removed and flip it over (flip front to back not left to right so you don't cut wrong). There are two plastic post about center left. The one on the left was not in use on mine. My rear wiper wiring harness on the body takes all the open space on the right side of the center post so you can't install the light there.
- I marked where I wanted to cut by drilling a small hole as close to the center post as I could and then placed my template up to that. This way I know that Im not cutting into that center post but as close to center as I could get for cosmetics.
- flip back over an place your template and trace.
- Use your dremel tool with a cutting wheel and cut out the hole. go easy and slow as the plastic will melt as you cut and just better to take it slow. Also my dremel head spins (like a old school chuck on a drill.... so don't rest it on the plastic as it will damage it as you cut.
- once the hole is cut.. flip it back over and cut away some of the little support structures near the hole as they will get in the way of the console mounting flush. I then changed dremel bits to a sanding wheel and touched up the rough edges and corners.
- Set that aside
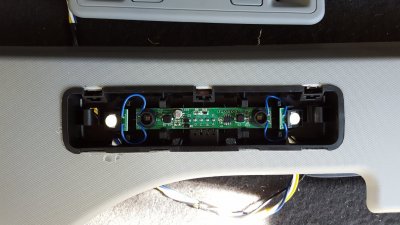
- Take the light console and flip it over. Take your dremel and cut the two large taps on the back clean off,, (flush)
- take your 4 wires and strip the tips
- use female connectors and connected one to each male pin on the light console. insert the correct wire (use your notes) and solder the wire to the connector.. (not the connector to the pin) If you try this with the connector not on the pin,,, it will fill with solder and wont go on the pin.
- once all 4 are done. take shrink tube/wrap and place over each connector to prevent them from touching as its a tight fit. Use your heat torch to heat and shrink them.
- You should be able to test the light at this point. Mine are not as bright as the 2nd/3rd row but good enough.
- check you wires and connectors wont come loose as again you don't want to have to pull things apart.
- If good... insert the light console (forward arrow forward) by first fishing the light through the hole, then positing the front side in first then press in the rear side with the three spring tabs.
- If you don't get a flush fit. note/mark where you need to trim away and get the razor blade or dremel tool out to cut. Also note the body panel might be a little thicker than the light console tabs allow for a flush mount. Mine was the case so I had to trim a little off the black tabs on the console and use the sanding wheel on the dremel to add a little angle to the cut edge.
- Also note that if your hole is tight,, the light bezel will not go back on.
- If a good fit,, press it in good and tight.. test the light again just to make sure all good.
- at this point snap the bezel cover back on it. note the little tabs can break off so don't just mash it on.. also though it will go on either way.. there is a font and back and you can tell by looking at how the bezel tabs align with the holes on the black body.
- Test the light again,,, put the panel back on,, make sure you tuck your excess wires up so not to rattle,,, test once more...
- now press the 2nd/3rd row light back in place (front first) making sure the splice connectors are not between the light and the vehicle body..
- Test
- Beer me!! lol
I would say this took me about 6 hours because I was figuring things out as I went.. but you should be able to do this in 3 hours.
Posted Pics!
Thank you GMC designers for forgetting this key need!
I am trying to put all of the pictures in order in an album but having a hard time organizing them. Here are a few pics...


