What did you do to your NNBS GMT900 Tahoe/Yukon Today?

Disclaimer: Links on this page pointing to Amazon, eBay and other sites may include affiliate code. If you click them and make a purchase, we may earn a small commission.

Joined
Apr 11, 2018
Posts
6,352
Reaction score
12,475
Location
St. Louis
Not sure if there are any ABS sensors or wheel speed sensors mounted to the backing plate that would need to be temporarily removed so the axle can be pushed inward to gain access to the C-clips
 

Sobro

Member
Joined
Feb 11, 2021
Posts
44
Reaction score
103
Location
Nashville
I didn't want to bury my above question with the forthcoming wall of text. Last summer, towing the camper from Nashville to Denver, we spent the first night in Columbia, MO and as we were approaching downtown Kansas City steam came out of the vents and the dash went Christmas tree. Fortunately it was midmorning and I had an easy out from the center lane to a quick exit.

In limp mode, I get to the top of the exit, look right and see a C-store a block away. As I get closer, it was pretty busy and the pumps in the small parking lot were going to be a problem for pulling in the rig.

I look at the next block up and see an old fashioned fuel station with two bays open, the glass on two sides on a corner, and bathrooms around the side.

I pull in and see POLICE in big letters, but got in far enough to get the trailer off the street anyway. I park and hop out and see the steam cloud indicating to all what kind of trouble I was in, and was suddenly surrounded by helpful KC cops. I had pulled into an area KCPD fueling and oil change station.

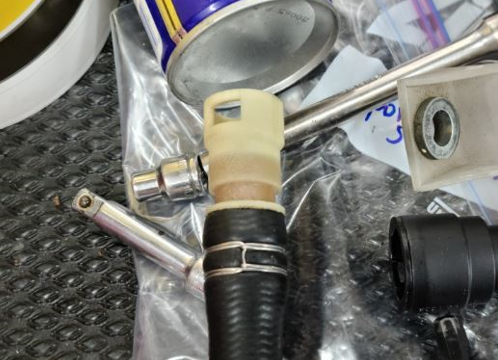
One of the cops pointed out the heater hose broken at the connection while I was still closely examining the radiator. I called Good Sam road service, who promises to tow both your vehicle and trailer, and found that their approved shop was only 4 long blocks up the road I was on.

We waited an hour and a half for a tow that finally called and said it would be another hour or so, and the fueling station manager, who had come in after we parked in his lot asked where we needed to be towed. He said, "Unhook your camper and we'll tow you over", indicating to his worker to fire up the flatbed around back.

Got it to the shop and the owner told me he could cut and clamp or wait for GM parts truck to swing by in a few hours. You all know my answer!

So I currently have one ticking time bomb hose connector and one that's been cut and clamped, with camping season approaching, which is why I need a better than patched up repair.

The KC cops couldn't have been nicer and saved me from arriving at our next campsite after midnight. They didn't even give me much grief after seeing my trailer spare tire cover with a Denver Broncos logo.
 

iamdub

Full Access Member
Joined
Apr 23, 2016
Posts
20,752
Reaction score
44,597
Location
Li'l Weezyana
What's the correct size to order?

Per their online form:
Size "A" would be 5/8"
Size "B" would be 1/2"
Size "C" would be 3/4"

You can kinda see the numbers written on the ends in the pics in this post: https://www.tahoeyukonforum.com/threads/growing-up-doesnt-have-to-suck.93510/post-1451010

BTW, I'd advise you to NOT trim the two rear pipes as I did unless you have a bulb flaring tool. I didn't flare them and tried them as-is and, as expected, had a small leak. Either trim them for clearance and bulb flare them or bend them (careful to not kink 'em!) to get the end far enough away.

Honestly, you'd be just fine with new OEM connectors. This means NO Dorman or any other aftermarket brands! These should ease your mind if the plastic ones give you PTSD from your experience in Kansas.
 

Just Fishing

Can't fix stupid
Joined
Aug 30, 2020
Posts
3,455
Reaction score
7,363
Location
Utah
Slowly working on the hoe still.

Last night I re-named her to Hoemare.
Nightmare + Hoe :boti:
(Pronounced Hoenir once issues have been sorted)
:yaoface2:


During my test drives with the line pressure gauges, i started noticing what felt like looseness in the alignment.
When pulling the wheels, i felt it
Probably a loose ball joint. :jester:

Didn't look at it too hard, but it just made the list of things to do.
After the engine and transmission issues have been taken care of.

I also made a slight mistake when placing the hoe in the garage.
I was trying to push it back and to the side of the garage to give me max space in there.
Since I'm planning to tackle the engine and transmission together, I need more space.

Got the hoe too close to the back of the garage.
I have my old craftsman toolbox behind it.
And there was a drill press next to that.
Hitch was touching the drill press and was binding on the bumper as i tried to jack the Hoemare up.
So i crawled under the back and pushed that took box back.
And managed to get the drill press on it's side.
Lucky!! :emotions33:

Last night,
Removed front axle to make things easier (+ I'm fkn good at it now... lol )
Got all cooler lines free.
All electrical disconnected and clear of the engine.
Oil Cooler lines all disconnected but not fully removed.
Starter removed
Decided to yank the passenger side transmission mount this time.
Much easier with it off.
Found that it can trap water in the bolts from the top!!
Got some pretty black crap right in my eye.
Spent some time flushing that crud out... lol

When this goes back together, I'll seal the top of that bolt up...
That water has been in there for quite some time.
The hoe has not driven in and has not had the under hood cleaned since summer/early fall...

And the Intake is also Off
Figuring if i do end up tackling the engine to transmission bolts while it's up on jack stands, I don't want the intake to get pinned against the firewall.
Noticed some oil film in my pretty AFR intake ports.
Oil film is the wrong color.
Looks like the oil that I drained from the intake originally.
Also noticed some weird flakes.
almost looks like leftovers of the sparkles... :confused:

When I have the engine out, I'll bore scope each cylinder.
Might end up pulling the heads anyways, so i can assess...

I might end up replacing that intake for good measure either way.
Found it's about $200 +/- to replace with a new OEM unit.

I also purchased a proper lifting plate for an LS, since I'm planning to do this with the heads on this time around.
Got it nice and cheap as an amazon return.
but it's for a Gen 3.
Worked perfectly, just has a space in the back.
Taped off to prevent gunk from falling in....


Major tasks today, Pull the Y pipe.
Text my welder and tell him I'm ready to add that extra O2 bung.
Drain and recover Coolant.
Remove radiator and water pump.
Unbolt converter.

Then see if I get any further today...
:fuckyea:
 

Just Fishing

Can't fix stupid
Joined
Aug 30, 2020
Posts
3,455
Reaction score
7,363
Location
Utah
Per their online form:
Size "A" would be 5/8"
Size "B" would be 1/2"
Size "C" would be 3/4"

You can kinda see the numbers written on the ends in the pics in this post: https://www.tahoeyukonforum.com/threads/growing-up-doesnt-have-to-suck.93510/post-1451010

BTW, I'd advise you to NOT trim the two rear pipes as I did unless you have a bulb flaring tool. I didn't flare them and tried them as-is and, as expected, had a small leak. Either trim them for clearance and bulb flare them or bend them (careful to not kink 'em!) to get the end far enough away.

Honestly, you'd be just fine with new OEM connectors. This means NO Dorman or any other aftermarket brands! These should ease your mind if the plastic ones give you PTSD from your experience in Kansas.

Thanks!!!
I was looking at that and was unsure what size it actually needed.

And I'm planning to run with my ClampTite for the hose clamp.
So far, I'm pretty impressed with this thing.

Image from when i replaced one of my hoses,
1645373615121.png

+ I might as well get my money's worth from the tool. ;)
(Youtube it if you want to see how it works)

This was just with a single wrap
You can double, triple, etc.

I'm planning to try a double this time around.
More wrap = even more secure!
 

Forum statistics

Threads
129,185
Posts
1,811,813
Members
92,285
Latest member
mont
Top