Growing up doesn't have to suck

Disclaimer: Links on this page pointing to Amazon, eBay and other sites may include affiliate code. If you click them and make a purchase, we may earn a small commission.

OP
OP
iamdub

iamdub

Full Access Member
Joined
Apr 23, 2016
Posts
20,752
Reaction score
44,597
Location
Li'l Weezyana
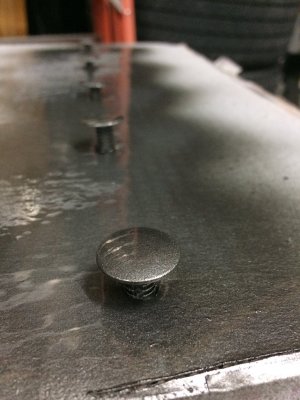
Those should blend it very nicely. Are you happy with the fit of the tree rivets?

Didn't bother to test them. It's either grind, weld and paint the roof (not happening) or cover the holes with a strip of body-colored molding (pricey and wasn't gonna paint that much) or cover each one individually with these things. So, regardless of the [initial] fit, these are gonna happen!

I did remove and measure a screw a while back and ordered these accordingly. They should snap in very firmly. I'll apply a thin layer of urethane sealant to the underside of the head since the threaded insert that these would bottom out on is raised above the roof's surface a millimeter or two. The sealant will make up that difference as well as seal and adhere the cap to the roof.
 
OP
OP
iamdub

iamdub

Full Access Member
Joined
Apr 23, 2016
Posts
20,752
Reaction score
44,597
Location
Li'l Weezyana
Four coats of base and four of clear. You know it's good when you can see the reflection of the ladder in the finish:

IMG_5068.JPG

Gonna let these sit for the night and maybe put them out in the sun tomorrow. If I don't work too late and have free time tomorrow afternoon, I'll take the rack off and clean, buff and wax where the mounts were and aim to get these plugs installed on Sunday.
 

kbuskill

***CAUTION*** I do my own stunts!
Joined
Mar 11, 2017
Posts
5,229
Reaction score
8,115
Location
NE. FL.
Four coats of base and four of clear. You know it's good when you can see the reflection of the ladder in the finish:

View attachment 236543

Gonna let these sit for the night and maybe put them out in the sun tomorrow. If I don't work too late and have free time tomorrow afternoon, I'll take the rack off and clean, buff and wax where the mounts were and aim to get these plugs installed on Sunday.

It's a shame you invested so much time into these caps when your getting ready to trade for that one with the 6.2l in it.

Oh wait, it's the same color... maybe you should just put these on the new one;)
 
OP
OP
iamdub

iamdub

Full Access Member
Joined
Apr 23, 2016
Posts
20,752
Reaction score
44,597
Location
Li'l Weezyana
It's a shame you invested so much time into these caps when your getting ready to trade for that one with the 6.2l in it.

Oh wait, it's the same color... maybe you should just put these on the new one;)

And I still have the stock suspension parts, stock wheels and tires, stock head unit...
 
OP
OP
iamdub

iamdub

Full Access Member
Joined
Apr 23, 2016
Posts
20,752
Reaction score
44,597
Location
Li'l Weezyana
Did a little work yesterday. Back when I hauled that 300 lbs. of sand for a portable basketball goal, I heard a few bumps and scrapes in the back. I finally had a chance to put it on the lift and inspect yesterday...


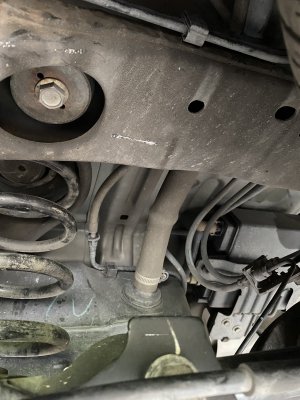
This ear on the axle side panhard mount tapped the cross member:

IMG_0108.JPG

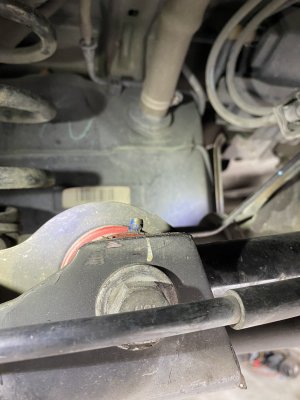
So I trimmed it down to just below the top edge of the bushing. It's only about 10mm of clearance, but it's a little something. Pretty sure I'll end up notching and boxing that cross member later. I didn't catch it at first, but the grease fitting is now exposed. I filed the cut part smooth and painted it and the line in the cross member so I'll know if it ever contacts again:

IMG_0109.JPG


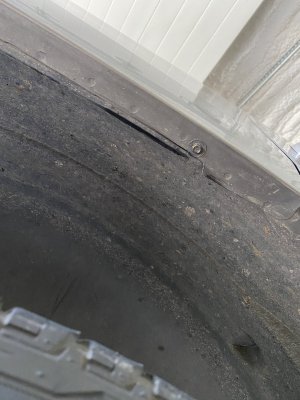
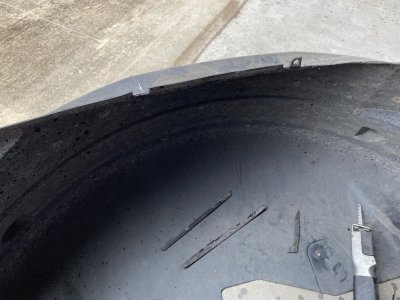
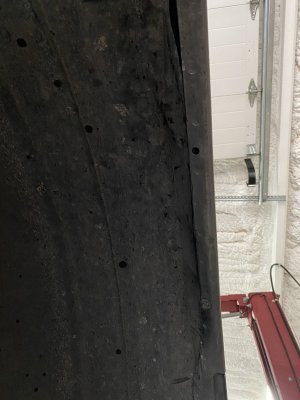
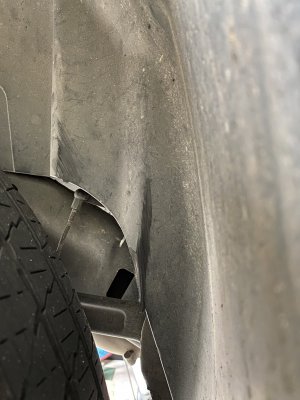
The tire rubbed the fender liner and lip. The plastic is ground down a little and the metal part just forward of it is what lightly sliced the tire tread:

IMG_0110.JPG


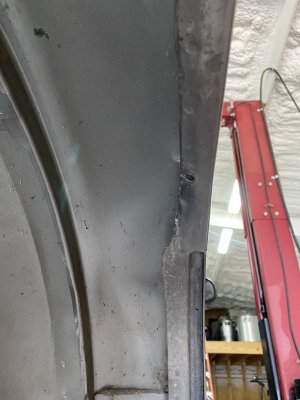
I removed the liner and rolled the fender lip:

IMG_0114.JPG

And trimmed down the lip of the liner. I trimmed a little more than what's in this pic. I also softened that wall with the heat gun and flexed it outward to tuck in tight to the metal fender lip. This was between one of the test-fits:

IMG_0117.JPG
 
Last edited:
OP
OP
iamdub

iamdub

Full Access Member
Joined
Apr 23, 2016
Posts
20,752
Reaction score
44,597
Location
Li'l Weezyana
...Aaaand done. Went from a 1.5" wide lip with an angled edge to a 1" wide lip with a rolled edge. I also ended up removing that screw since it wasn't needed and only added a sharp metal edge. Doesn't sound like much gain in clearance, but it was barely touching and I gained 1/2" of clearance. That's pretty significant in this area:

IMG_0122.JPG

It was also rubbing inside, so I used the heat gun again to soften and reshape it for a lot more clearance:

IMG_0112.JPG


The front isn't gonna be as easy and I don't know if I'll even bother getting involved today. I've had a headache since I woke up.
 
Last edited:
OP
OP
iamdub

iamdub

Full Access Member
Joined
Apr 23, 2016
Posts
20,752
Reaction score
44,597
Location
Li'l Weezyana
Swapped in the Belltech 5305 coils yesterday. On the test drive/shakedown to settle the suspension, it felt great as far as stability. But, if they're any softer than the TJ coils, it may be something like 10% softer- barely noticeable. Everyone talks about how great the 5305s ride and many complain that they're too soft. I was hoping for too soft and at least 4" of drop. After a very aggressive shakedown, I parked it back in the shop and measured the rear to be right at 3/4" higher than with the TJ coils.

So, I lost drop and they ride essentially the same. Oh- they're also noisier because of the dead coils compressed against each other. They haven't been used in a good while and have some surface rust on the contacting edges of the dead coils. I expect the noise to subside after the surface rust rubs off so I'm not so concerned about that.

A Jeep buddy told me he's had it take months for springs to settle. I don't expect these to settle 3/4", but I'd like to get them settled ASAP. I barely drive it, so I'm probably gonna load a few hundred pounds of weight in the back and let it sit loaded for a few weeks while it sits in the shop.

After that, I can trim off some of the dead coils and probably get upwards of 2" more drop if I wanted to trim that much. But, my concern at the moment is trying to find why mine rides so damned firm when many others say theirs rode soft.

I also compressed a shock to ensure that it had plenty of travel and wasn't bottoming out. It compressed about 4" from it's length when mounted at the lowered ride height, which is plenty and coincides with the listed specs of the shock.

More experimenting to follow...
 

kbuskill

***CAUTION*** I do my own stunts!
Joined
Mar 11, 2017
Posts
5,229
Reaction score
8,115
Location
NE. FL.
Swapped in the Belltech 5305 coils yesterday. On the test drive/shakedown to settle the suspension, it felt great as far as stability. But, if they're any softer than the TJ coils, it may be something like 10% softer- barely noticeable. Everyone talks about how great the 5305s ride and many complain that they're too soft. I was hoping for too soft and at least 4" of drop. After a very aggressive shakedown, I parked it back in the shop and measured the rear to be right at 3/4" higher than with the TJ coils.

So, I lost drop and they ride essentially the same. Oh- they're also noisier because of the dead coils compressed against each other. They haven't been used in a good while and have some surface rust on the contacting edges of the dead coils. I expect the noise to subside after the surface rust rubs off so I'm not so concerned about that.

A Jeep buddy told me he's had it take months for springs to settle. I don't expect these to settle 3/4", but I'd like to get them settled ASAP. I barely drive it, so I'm probably gonna load a few hundred pounds of weight in the back and let it sit loaded for a few weeks while it sits in the shop.

After that, I can trim off some of the dead coils and probably get upwards of 2" more drop if I wanted to trim that much. But, my concern at the moment is trying to find why mine rides so damned firm when many others say theirs rode soft.

I also compressed a shock to ensure that it had plenty of travel and wasn't bottoming out. It compressed about 4" from it's length when mounted at the lowered ride height, which is plenty and coincides with the listed specs of the shock.

More experimenting to follow...
Airlift bags hooked to the ALC.... meow!
 
OP
OP
iamdub

iamdub

Full Access Member
Joined
Apr 23, 2016
Posts
20,752
Reaction score
44,597
Location
Li'l Weezyana
Airlift bags hooked to the ALC.... meow!

Not until I know what bags I can use! If I leave the coils as-is, I'll have to use the tall bags. If I cut off the dead coils, I'll have to use the short bags.

The Air Lift bags aren't designed to stretch and grow a whole lot, nowhere near what the sleeve bags on the factory shocks do. So using the correct bag and not over-pressurizing it is critical. They're rated for something like 35 psi max and the ALC system puts out over 100 psi. So if the bag is too short and doesn't lift the rear where it needs to be by the time it has 35 in it, it can pop cuz the factory compressor will keep going until the sensors report the expected ride height. I'll need it to be at the ride height I want with maybe 5 psi in the bags, unless the coils are soft enough to need more. Static height, dynamic limits, pressure limit incompatibilities... There's a lot to balance! First thing is to get it sitting and riding how I want without the ALC system. I promise you, I often go to bed and wake up pondering the mechanics of coil springs!
 

Forum statistics

Threads
129,179
Posts
1,811,756
Members
92,274
Latest member
stevensavino
Top