Project 99 Yukon

Disclaimer: Links on this page pointing to Amazon, eBay and other sites may include affiliate code. If you click them and make a purchase, we may earn a small commission.

Tonyrodz

Resident Resident
Joined
Feb 16, 2012
Posts
30,988
Reaction score
45,156
Location
Central Jersey
You
Finally got around to:

A.) swapping the 3.42 to 4.10 diff regear.
B.) Also, tore into and upgraded the transfer case that was plaguing me for the last several months.

i found out that the old shop had installed some parts bass-ackwards which caused some parts to overheat, melt and fuse. No wonder the 4lo wouldn't engage. So with that, the only other item on my checklist is the MPFI which I hope to tear into this week before my next trip.
You should give that shop hell, and try to get some money back.
 
OP
OP
My99Yukon

My99Yukon

Full Access Member
Joined
Apr 27, 2017
Posts
109
Reaction score
129
I was pretty upset when I saw their "upgrade." They put the case saver in backwards of all things. I will surely let them know but things like this are rarely worth fighting over. The consumer just doesn't seem to have much to stand on in expensive arguments like this. Since it was a fix by necessity in the middle of winter, and I thought I could trust them, I can only chalk this up to a bad outcome and keep moving.

Thanks for your feedback though. It is a good lesson that I share here so all can be wary and do their second and third due diligence...unless necessity dictates an immediate need...which I would avoid at all cost. Cheers.
 
OP
OP
My99Yukon

My99Yukon

Full Access Member
Joined
Apr 27, 2017
Posts
109
Reaction score
129
MPFI Upgrade Complete

I finally had the time and space to make the long-awaited MPFI conversion (images at bottom of post). The Yukon was running well but I knew that it had so much more potential, could get better MPG's, more responsive throttle and more importantly, with 199K on the original SPFI, they were long overdue. I knew this long ago when I pulled off the air intake and peered into a black hole of carbon buildup on the butterfly.

The job was about 7 hours from start to finish but much of the time was spent trying to seat the upper intake flush to the lower intake. The spider head unit would simply not slide cleanly through. After a few hours of wrestling, and silicone spray, it seated enough to go through the torque sequence on the studs and complete the seating.

Several videos helped out with the process enormously and I remember Brian on briansmobile1 channel on the Spider Conversion made the comment about "48 or 49 our of 50 still won't make it run right...noting that there are so many electrical and vacuum connections to remove. After I buttoned it up and was proud of my conversion, the first start gave me a P0107 and P1107. I checked my work, reset the codes and tried again. Same result.

This morning, after some research and digging about the MAP sensor issue, I fished under the main hub of wires and discovered that I had missed the MAP Sensor plug. It was hiding from me under that rat's nest of wires. Plugged in and codes cleared, the Yukon drives like a beast.

Post conversion thoughts: More power, smoother pickup especially above 3k RPM...and i expect a solid improvement in MPG which I will post results after the next cross country.

Here are some pics:

Upper manifold removed

MrCNtw6tQF+ViChQ08ucnw.jpg

Before MPFI Converstion: The coolant was a bit of spillover from when removed the upper radiator hose. I could not get the upper intake manifold out without removing the hose and I didnt want to drain the coolant.

vWgJnPYySTiBHWnKiaoHxA.jpg

A light cleaning:

6VZjcT1UQVCgie8XX4wF2A.jpg

MPFI Installed

UnJCrz3TQSK14QhuwxFkxQ.jpg

All buttoned Up:

+UxKBgcDSJmzySO0oLkWWg.jpg


Final Note:

There are lots of ways to skin this cat with respect to what you have to remove. Taking a few pictures and videos of the engine bay before you tear into is a good idea, especially you have already have some engine mods in place.

Good luck for all those who make the conversion. From my first day of driving with the new MPFI, i recommend it to all OBS owners.

Cheers.
 

Tonyrodz

Resident Resident
Joined
Feb 16, 2012
Posts
30,988
Reaction score
45,156
Location
Central Jersey
MPFI Upgrade Complete

I finally had the time and space to make the long-awaited MPFI conversion (images at bottom of post). The Yukon was running well but I knew that it had so much more potential, could get better MPG's, more responsive throttle and more importantly, with 199K on the original SPFI, they were long overdue. I knew this long ago when I pulled off the air intake and peered into a black hole of carbon buildup on the butterfly.

The job was about 7 hours from start to finish but much of the time was spent trying to seat the upper intake flush to the lower intake. The spider head unit would simply not slide cleanly through. After a few hours of wrestling, and silicone spray, it seated enough to go through the torque sequence on the studs and complete the seating.

Several videos helped out with the process enormously and I remember Brian on briansmobile1 channel on the Spider Conversion made the comment about "48 or 49 our of 50 still won't make it run right...noting that there are so many electrical and vacuum connections to remove. After I buttoned it up and was proud of my conversion, the first start gave me a P0107 and P1107. I checked my work, reset the codes and tried again. Same result.

This morning, after some research and digging about the MAP sensor issue, I fished under the main hub of wires and discovered that I had missed the MAP Sensor plug. It was hiding from me under that rat's nest of wires. Plugged in and codes cleared, the Yukon drives like a beast.

Post conversion thoughts: More power, smoother pickup especially above 3k RPM...and i expect a solid improvement in MPG which I will post results after the next cross country.

Here are some pics:

Upper manifold removed

View attachment 202692

Before MPFI Converstion: The coolant was a bit of spillover from when removed the upper radiator hose. I could not get the upper intake manifold out without removing the hose and I didnt want to drain the coolant.

View attachment 202693

A light cleaning:

View attachment 202694

MPFI Installed

View attachment 202695

All buttoned Up:

View attachment 202696


Final Note:

There are lots of ways to skin this cat with respect to what you have to remove. Taking a few pictures and videos of the engine bay before you tear into is a good idea, especially you have already have some engine mods in place.

Good luck for all those who make the conversion. From my first day of driving with the new MPFI, i recommend it to all OBS owners.

Cheers.
I didn't do the conversion, but I did have to replace the spider injection in my 01 Express van. MAN, what a PITA that was. I had to take the intake off and on about 6 times. The first setup was defective too, which made it so much more fun. Just a heads up, over time those plastic lines going to the injectors can crack, leading to crappy running and driveability issues.
 
OP
OP
My99Yukon

My99Yukon

Full Access Member
Joined
Apr 27, 2017
Posts
109
Reaction score
129
My sweet War Wagon turned 200,000 miles today! Running strong after an MPFI upgrade and fuel filter change. MPG improved over 1.5 mpg to nearly 16.5 mpg at 80 mph and 2400rpm with the new 4.10'sSZqFgnQaSFmcnm0R9fsZ8Q.jpg
 

fastpat

Full Access Member
Joined
Jun 2, 2018
Posts
163
Reaction score
70
Location
Upcountry South Carolina
I bought a double USB port plus voltage display dongle. Oddly, it works in the two extra outlets down on the ashtray, but not in the lighter port that's right next to them. I have no need for a lighter, though I won't throw the lighter away, it goes in the console or glove box in case I need to light something and forgot my Bic.

https://www.amazon.com/gp/product/B0773BYS6P/

2v2JgeNcdxQKds.jpg
 

Squirrelsmith

Full Access Member
Joined
Jan 21, 2018
Posts
914
Reaction score
788
Wow you got a lot done fast!
If it was me it would be year one... year 2... year 3 lol
 
OP
OP
My99Yukon

My99Yukon

Full Access Member
Joined
Apr 27, 2017
Posts
109
Reaction score
129
A/C Blower Motor - Blower Motor Resister - A/C Control Panel Switch

It was only 110 deg the other day and my A/C fan decided to stop working. I had replaced the dash control panel just 27 months ago so I assumed that could not possibly be the issue.

The blower motor had been making noise, so I assumed the bearing finally seized. Since I was going to replace the blower motor, I decided to also replace the resistor since they frequently fail.

After r/r both parts, the fan still did not work. I was really trying to avoid spending another $200 on the fan switch but that was clearly the issue.

So $200 later (plus the $90 for the resistor and blower motor), the A/C blows cold again.

At least it gave me the opportunity to clean the A/C condenser! This is after cleaning out the big debris and before spraying the condenser out.

IMG_7295.jpg

Not sure why there is no prefilter in these rigs. Thanks GM

IMG_7296.jpg
 
OP
OP
My99Yukon

My99Yukon

Full Access Member
Joined
Apr 27, 2017
Posts
109
Reaction score
129
I replaced:

Rear shocks with Explorer Pro Comp ES6000 924509.

Front shocks with Explorer Pro Comp ES6000 918501

Added some Daystar Universal shock boots.

The shocks were due for a swap and these were affordable and gave me some extra length to allow for the slight torsion lift and the extra leaf in the rear.

Replaced front disc brake rotors (AC Delco) and front brake pads (ACDelco 17D369MH Professional Semi-Metallic Front Disc Brake Pad Set)

at the same time I did the shocks.

Rear shocks pics only.
46E0D7D6-AA6E-4005-B7F4-BA4E52F3C841_1_201_a.jpeg

46E0D7D6-AA6E-4005-B7F4-BA4E52F3C841_1_201_a.jpeg
 
Last edited:
OP
OP
My99Yukon

My99Yukon

Full Access Member
Joined
Apr 27, 2017
Posts
109
Reaction score
129
Oil Cooler Lines Replacement

The leak in my AC Delco oil cooler lines was getting worse after a few years of service, for the second time, so I decided to replace them with -6AN braided stainless lines and the appropriate adapters. I believe this will be a nearly permanent fix for the life of the vehicle.

I replaced the oil filter housing assembly gasket since it was the original and had a slight weep but mostly because removal of the assembly made the process significantly easier and the original gasket was 21 years old.

New AC Delco Lines: ~$110.00
Stainless braided lines cost: ~$165.00

Parts List:

I was racing against the clock to get this done and I did not take too many pics but here are the important parts of the process:

Build the lines:
First, let me say that the amount of fear across the internet over building these lines is unjustified. Having never worked with stainless braided lines, I did way more research than I should have and still, with all the parts laid out in front of me, wondered if I had the right tools to get the job done.

Cutting the lines, according to most pundits, was this incredibly daunting task. Cut off wheel, blah blah...I had none of that. I tried a Dremel with cut off wheels and it sucked and I was not about to buy a $140 line cutter for the project.

I measured the OEM lines at Oreilleys at 53" Upper and 47" lower. I accounted a bit for the additional length of the adapters and fittings by taking 1" off the upper and 1/2" off the lower. I did not want to have the Yukon torn apart without replacement lines but my gut told me they would be a bit on the long side. I was right and could have easily taken 1.5" additional from each line.

My lines: Upper - 52" and Lower: 46.5" (I would take another 1.5" off each line if I could)

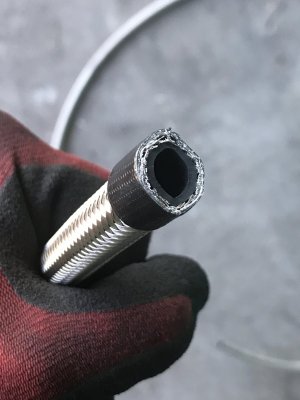
I taped the end tightly with gorilla tape, broke out my Stanley 8" Fatmax curved cutter, paused, and with a swift, firm, decisive squeeze, the cut was perfect and you can trim any small remnants with a scissors. Squeeze the line ends with a pliers if you have any distortion so the end is round again.


The Oil Cooler ends:
1. Work the line adapter onto the line and twist clockwise until it is mostly seated. Grab some large pliers or vice grip, squeeze the coupling to finish a few more turns while you press down on the end with your palm until the hose is fully seated.
2. Place the line adapter into a vice ( protect the aluminum with some magnetic nylon vice attachments)
3. Thread the line fitting until snug. I used an open end wrench to snug the two parts until they were flush and the faces were aligned.
4. I used a 45 deg (lower) and a 90 deg (upper) coming off the oil cooler

IMG_0330.jpeg

IMG_0332.jpeg


Filter Housing Line Ends
1. Same process using the adapters listed above

Filter Housing Inserts
1. Once you remove the filter housing, you can remove the old clip adapters. I found it easiest to pull the entire housing, place it on a bench and do the work off the vehicle. You will have way easier access and it is not a bad time to replace the gasket.
2. I prepared the fittings to save time in the garage.
IMG_0333.jpeg

3. I found I had to put the assembly into a vice to properly seat these. I just used a crescent it was perfect.
4. Couple the hose AN fitting to the housing. Again, the vice came in very handy.

Oil Cooler Connection
1. Remove lines from Oil Cooler and pull the fully disconnected lines through the front of the frame.
2. Install the 20x1.5 fittings into the oil cooler

Install Filter Housing
1. Since the lines are now installed onto the housing, I followed the path of the original lines and maneuvered the housing into place.
2. place the gasket onto the housing interior with some oil to keep it in place.
3. run the bolts through the housing and gasket to keep it aligned.
4. Tighten the filter housing

IMG_0346.jpeg


Final Thoughts:
  1. The entire process was about 3 hours. I wrestled with getting the pins out of the flair nuts. There is not a lot of working room and yes I have done it before.
  2. The upper line was solidly stuck even after removing the pin. I pulled and twisted the hell out of it until it finally broke loose. The part is going in the trash so don't worry about beating it up.
  3. Shorter lines by about 1"-1.5" would be fine and probably a cleaner install.
  4. Of course, since you have to drain the oil, this is a great time for new oil and filter. With the new lines, new oil and filter, my oil pressure dropped solidly into specs and it runs like a top.
  5. With only 5 image uploads, that's all for now and good luck to all who do this upgrade.

IMG_0318.jpeg
 

Forum statistics

Threads
129,180
Posts
1,811,778
Members
92,279
Latest member
Tahoe1844
Top