New distributor, plug wires, coil pack, and ICM today i am getting spark and fuel at injectors but she still wont even pop..it dosent make any sense ive followed the directions tried just by listening and still nothing..where do i go from here?? Also would i have power to the ign coil if the crank sensor was bad does anyone know?
You are using an out of date browser. It may not display this or other websites correctly.
You should upgrade or use an alternative browser.
You should upgrade or use an alternative browser.
Please help!! Distributor problems..
- Thread starter 96tsport
- Start date
Disclaimer: Links on this page pointing to Amazon, eBay and other sites may include affiliate code. If you click them and make a purchase, we may earn a small commission.
I cant even get it to fire thats the problem..if i could get it to run id be in buisnessOnce the truck is running, you do not need a sophisticated scan tool or pay a shop for their labor to set the final timing. All you need is some time and patience and a few simple items. First, make a pointer that will run from the distributor to the firewall. I used a yardstick. Put some masking tape on the firewall where the yardstick placement can be marked. Attach the stick to a flat spot on the distributor so the placement can be easily replicated. See where the pointer lands on the tape and make a mark. Clear the code P1345, move the stick about 1/8 inch in either direction and start the truck. What you are trying to do is rotate the distributor to a point where the code no longer is shown. Continue this process. If the engine starts running rougher, move the distributor in the other direction. This procedure took me about a half an hour. When it finally got to the point where no code is thrown, I tightened the distributor and ran the truck for another 60,000 miles.
Pull #1 plug wire and verify that you are actually getting spark at the plug wire when you're turning the engine over, if you have spark then i'd say you're probably 180 out. Set it back on TDC #1 cylinder, your rotor should then be pointed towards the left side of the cap" pass side" . Remember that even though #1 plug wire goes into the cap on the 1st one on the rt "dr side" the actual terminal for #1 wire is on the lt. Follow that ridge on the cap where the wire plugs in and follow the ridge to the lt and you'll see what i mean. My lt and rt directions are as if your laying on the engine facing the distributor. I'm not trying to be condescending in telling you the basics, its VERY easy to get messed up with this. Check this and let us know what you find. Good luck, i know from experience it can be a ***** sometimes! Lol
Sent from my SAMSUNG-SM-G930A using Tapatalk
Sent from my SAMSUNG-SM-G930A using Tapatalk
east302
Full Access Member
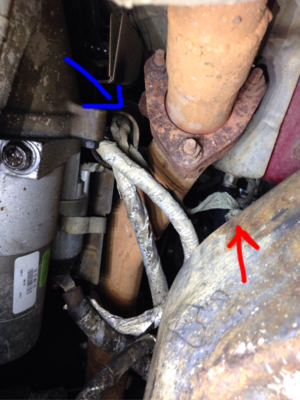
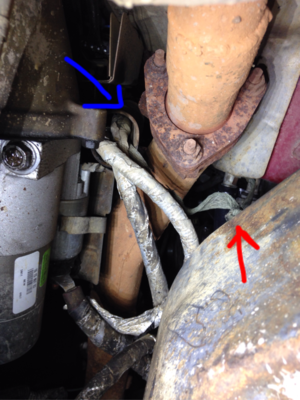
For the ground wire, there is a stud right below the heater hoses. It connects to that and the frame. The second strap connects to that same frame bolt (red arrow in photo) and goes up into a sleeve near the starter (blue arrow). I couldn't tell where it went from there.
As for the distributor, it does sound like you could be at TDC for the exhaust stroke and not compression. They sell a tool with a whistle on it that sounds when the valves are closed, or just try turning the crank one revolution (aligning the marks) and try stabbing the distributor again.
Here is the procedure from the manual, maybe it will help...
INSTALLATION PROCEDURE 2
Rotate the number 1 cylinder to Top Dead Center (TDC) of the compression stroke.
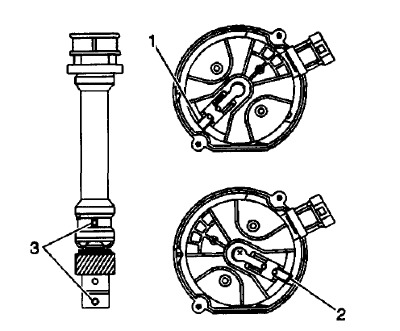
Align white paint mark on the bottom stem of the distributor, and the pre-drilled indent hole in the bottom of the gear (3).
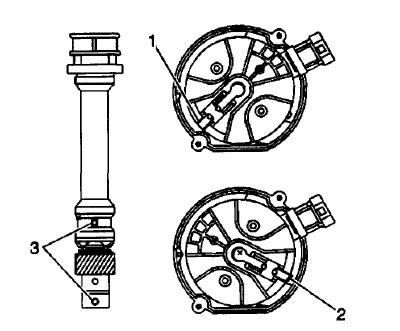
With the gear in this position, the rotor segment should be positioned as shown for a V6 engine (1) or V8 engine (2).
The alignment will not be exact.
If the driven gear is installed incorrectly, the dimple will be approximately 180 degrees opposite of the rotor segment when it is installed in the distributor.
NOTE : The OBD II ignition system distributor driven gear and rotor can be installed in multiple positions. In order to avoid mistakes, make sure to mark the distributor in the following positions:
3.1. The distributor driven gear.
3.2. The distributor shaft.
3.3. The rotor holes for the same mounting position upon reassembly.
Installing the driven gear 180 degrees out of alignment, or locating the rotor in the wrong holes, will cause a no-start condition. Premature engine wear or damage may result.
NOTE : Installing the driven gear 180 degrees out of alignment, or locating the distributor rotor in the wrong holes, may cause a no-start condition. Premature engine wear and damage may result.
Using a long screw driver, align the oil pump drive shaft to the drive tab of the distributor.
Guide the distributor into the engine. Ensure that the spark plug towers are perpendicular to the centerline of the engine.
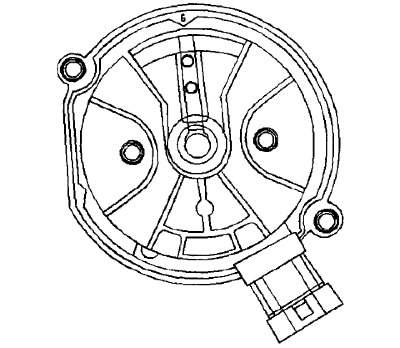
Once the distributor is fully seated, the rotor segment should be aligned with the pointer cast into the distributor base.
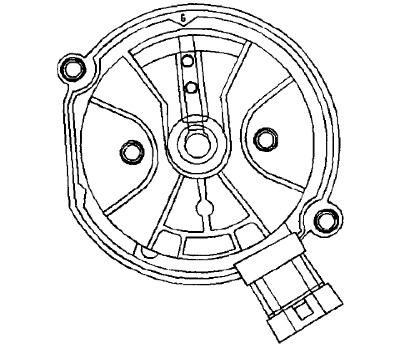
This pointer may have a 6 cast into it, indicating that the distributor is to be used on a 6 cylinder engine or a 8 cast into it, indicating that the distributor is to be used on a 8 cylinder engine.
If the rotor segment does not come within a few degrees of the pointer, the gear mesh between the distributor and the camshaft may be off a tooth or more.
If this is the case, repeat the procedure again in order to achieve proper alignment.
NOTE : Refer to Fastener Notice in Cautions and Notices.
Install the distributor mounting clamp.
Tighten
Tighten the distributor clamp bolt to 25 Nm (18 lb ft) .
Install the distributor cap.
Install two NEW distributor cap screws.
Tighten
Tighten the screws to 2.4 Nm (21 lb in) .
Install the electrical connector to the distributor.
Install the spark plug wires to the distributor cap.
IMPORTANT : If the Malfunction Indicator lamp is turned on after installing the distributor, and a DTC P1345 is found, the distributor has been installed incorrectly.
Repeat INSTALLATION PROCEDURE 2 for proper distributor installation.
Sent from my iPhone using Tapatalk

As for the distributor, it does sound like you could be at TDC for the exhaust stroke and not compression. They sell a tool with a whistle on it that sounds when the valves are closed, or just try turning the crank one revolution (aligning the marks) and try stabbing the distributor again.
Here is the procedure from the manual, maybe it will help...
INSTALLATION PROCEDURE 2
Rotate the number 1 cylinder to Top Dead Center (TDC) of the compression stroke.
Align white paint mark on the bottom stem of the distributor, and the pre-drilled indent hole in the bottom of the gear (3).

With the gear in this position, the rotor segment should be positioned as shown for a V6 engine (1) or V8 engine (2).
The alignment will not be exact.
If the driven gear is installed incorrectly, the dimple will be approximately 180 degrees opposite of the rotor segment when it is installed in the distributor.
NOTE : The OBD II ignition system distributor driven gear and rotor can be installed in multiple positions. In order to avoid mistakes, make sure to mark the distributor in the following positions:
3.1. The distributor driven gear.
3.2. The distributor shaft.
3.3. The rotor holes for the same mounting position upon reassembly.
Installing the driven gear 180 degrees out of alignment, or locating the rotor in the wrong holes, will cause a no-start condition. Premature engine wear or damage may result.
NOTE : Installing the driven gear 180 degrees out of alignment, or locating the distributor rotor in the wrong holes, may cause a no-start condition. Premature engine wear and damage may result.
Using a long screw driver, align the oil pump drive shaft to the drive tab of the distributor.
Guide the distributor into the engine. Ensure that the spark plug towers are perpendicular to the centerline of the engine.
Once the distributor is fully seated, the rotor segment should be aligned with the pointer cast into the distributor base.

This pointer may have a 6 cast into it, indicating that the distributor is to be used on a 6 cylinder engine or a 8 cast into it, indicating that the distributor is to be used on a 8 cylinder engine.
If the rotor segment does not come within a few degrees of the pointer, the gear mesh between the distributor and the camshaft may be off a tooth or more.
If this is the case, repeat the procedure again in order to achieve proper alignment.
NOTE : Refer to Fastener Notice in Cautions and Notices.
Install the distributor mounting clamp.
Tighten
Tighten the distributor clamp bolt to 25 Nm (18 lb ft) .
Install the distributor cap.
Install two NEW distributor cap screws.
Tighten
Tighten the screws to 2.4 Nm (21 lb in) .
Install the electrical connector to the distributor.
Install the spark plug wires to the distributor cap.
IMPORTANT : If the Malfunction Indicator lamp is turned on after installing the distributor, and a DTC P1345 is found, the distributor has been installed incorrectly.
Repeat INSTALLATION PROCEDURE 2 for proper distributor installation.
Sent from my iPhone using Tapatalk
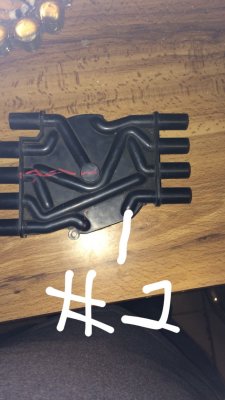
Pull #1 plug wire and verify that you are actually getting spark at the plug wire when you're turning the engine over, if you have spark then i'd say you're probably 180 out. Set it back on TDC #1 cylinder, your rotor should then be pointed towards the left side of the cap" pass side" . Remember that even though #1 plug wire goes into the cap on the 1st one on the rt "dr side" the actual terminal for #1 wire is on the lt. Follow that ridge on the cap where the wire plugs in and follow the ridge to the lt and you'll see what i mean. My lt and rt directions are as if your laying on the engine facing the distributor. I'm not trying to be condescending in telling you the basics, its VERY easy to get messed up with this. Check this and let us know what you find. Good luck, i know from experience it can be a ***** sometimes! Lol
Sent from my SAMSUNG-SM-G930A using Tapatalk
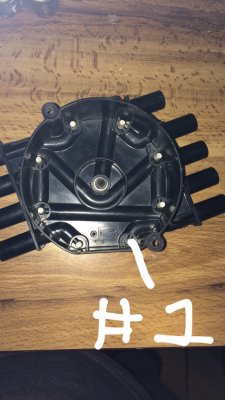
Im not exactly following u my rotor keeps ending up on driver side aligning with the #8 on dis body and the #1 cylinder on cap unless the rotor is suppose to point towards 2 or 8 on the cap but that goes against lining it up with the "8" on distributor body like the directions are saying
Last edited:
This is what i have been doing and still have a no start..would else could cause it? this is assuming that ground strap wouldnt cause a no start as i havnt fixed it yetFor the ground wire, there is a stud right below the heater hoses. It connects to that and the frame. The second strap connects to that same frame bolt (red arrow in photo) and goes up into a sleeve near the starter (blue arrow). I couldn't tell where it went from there.
As for the distributor, it does sound like you could be at TDC for the exhaust stroke and not compression. They sell a tool with a whistle on it that sounds when the valves are closed, or just try turning the crank one revolution (aligning the marks) and try stabbing the distributor again.
Here is the procedure from the manual, maybe it will help...
INSTALLATION PROCEDURE 2
Rotate the number 1 cylinder to Top Dead Center (TDC) of the compression stroke.
Align white paint mark on the bottom stem of the distributor, and the pre-drilled indent hole in the bottom of the gear (3).
With the gear in this position, the rotor segment should be positioned as shown for a V6 engine (1) or V8 engine (2).
The alignment will not be exact.
If the driven gear is installed incorrectly, the dimple will be approximately 180 degrees opposite of the rotor segment when it is installed in the distributor.
NOTE : The OBD II ignition system distributor driven gear and rotor can be installed in multiple positions. In order to avoid mistakes, make sure to mark the distributor in the following positions:
3.1. The distributor driven gear.
3.2. The distributor shaft.
3.3. The rotor holes for the same mounting position upon reassembly.
Installing the driven gear 180 degrees out of alignment, or locating the rotor in the wrong holes, will cause a no-start condition. Premature engine wear or damage may result.
NOTE : Installing the driven gear 180 degrees out of alignment, or locating the distributor rotor in the wrong holes, may cause a no-start condition. Premature engine wear and damage may result.
Using a long screw driver, align the oil pump drive shaft to the drive tab of the distributor.
Guide the distributor into the engine. Ensure that the spark plug towers are perpendicular to the centerline of the engine.
Once the distributor is fully seated, the rotor segment should be aligned with the pointer cast into the distributor base.
This pointer may have a 6 cast into it, indicating that the distributor is to be used on a 6 cylinder engine or a 8 cast into it, indicating that the distributor is to be used on a 8 cylinder engine.
If the rotor segment does not come within a few degrees of the pointer, the gear mesh between the distributor and the camshaft may be off a tooth or more.
If this is the case, repeat the procedure again in order to achieve proper alignment.
NOTE : Refer to Fastener Notice in Cautions and Notices.
Install the distributor mounting clamp.
Tighten
Tighten the distributor clamp bolt to 25 Nm (18 lb ft) .
Install the distributor cap.
Install two NEW distributor cap screws.
Tighten
Tighten the screws to 2.4 Nm (21 lb in) .
Install the electrical connector to the distributor.
Install the spark plug wires to the distributor cap.
IMPORTANT : If the Malfunction Indicator lamp is turned on after installing the distributor, and a DTC P1345 is found, the distributor has been installed incorrectly.
Repeat INSTALLATION PROCEDURE 2 for proper distributor installation.
Sent from my iPhone using Tapatalk
Last edited:
Similar threads
- Replies
- 46
- Views
- 5K
- Replies
- 10
- Views
- 2K

