Modded
That Guy
- Joined
- May 3, 2009
- Posts
- 6,942
- Reaction score
- 107
Alright I guys I decide to start a technical thread on lighting mods to help the members on here with a lot of questions I am going to complete within the next two weeks, they consist of;
1. HID install step by step for the low beam headlights.
2. LED combo install for the rear taillights and 3rd brake lights, with halogen bulb reverse lights and LED license plate lights!
Anybody who has any questions just post it here and I will be happy to answer it for you’ll. The mods that say coming soon will also be posted in this same thread soon.
And last of all these mods took/will take a lot of time and money to complete for me, so if you want to say something irrelevant to this thread just take it to the Off-Topic part of this forum. Thanks!
1. HID install step by step for the low beam headlights.
First your gonna have to get the push pins and two bolts out of the inner wheel liner


Then you will take out the 3rd bolt holding the headlight in, this is the bolt that always gives people issues when removing it because they don’t know its there.

Then you will remove the front fascia bumper brackets which are held in with two bolts.


Remove the six bolts holding down the fascia on top of the grille, there are two on each outer end and like 4 in between those.

Remove the two bolts holding down the headlight from the top-front completing the other 2/3 of the existing headlight bolts.

Back of my headlight assembly. Take note of the disconnected Assembly voltage supply connector which gives power to all the bulbs in the headlight. You HAVE to disconnect this just to make sure you don’t short anything or shock yourself, and plus atleast you won’t have to disconnect the battery and lose your vehicle settings!

---------- Post added at 02:35 AM ---------- Previous post was at 02:34 AM ----------
Headlight removed on the left hand side. To get it out on both sides all you have to do is disconnect the clip holding each light from the rear and put some gentle persuasion into pulling the sides closer to the grille towards you, watching out for the clips holding and sealing the light from scraping the fascia beside the grille and part of the fascia that is taped up. After the corner of the light comes out with the two guiding clips behind the orange sidemarker, then use the extending part of the fender as a turning axis and pull it towards you and bam its out, sorry I forgot to get detailed pics of this part.


Apexcone Slim-Ballast HID kit. Any HID brand will work, slim or not, but slim may make it a bit sleeker of an install!

Apexcone slim ballast and igniter in the box with High voltage connectors.

Apexcone HID bulb (6000k) with High voltage connectors to attach to the ballast/igniter output.

Igniter showing a bit after the headlight is installed and sealed up.

Ballast installed with 3M double sided tape and all connected up. It goes like this, connect the ballast input connector to the headlight low beam H11 output connector (you may have to reverse this plug later to get the bulb to light up properly so don’t seal up everything). Then connect high voltage connectors from the igniter to the high voltage input of the bulb. And then when you’re done remove the protective cover of the bulb and put it straight into the headlight without EVER touching the bulb with your fingers or on any surface to prevent future bulb damage.

The ballast installed with 3M double sided tape on the inner part of the metal beam beside the headlight. As you can see there is a material covering it form sight after install. That is the sleekest place to put the ballast because after it is put there you will not be able to see it anymore.


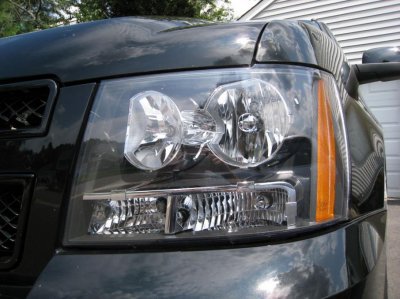
LH Headlight back in. Just do everything in reverse and get those lights back in and put every removed bolt back on from ALL the removed places!
Do you see the ballast or any wires?

1. HID install step by step for the low beam headlights.
2. LED combo install for the rear taillights and 3rd brake lights, with halogen bulb reverse lights and LED license plate lights!
Anybody who has any questions just post it here and I will be happy to answer it for you’ll. The mods that say coming soon will also be posted in this same thread soon.
And last of all these mods took/will take a lot of time and money to complete for me, so if you want to say something irrelevant to this thread just take it to the Off-Topic part of this forum. Thanks!
1. HID install step by step for the low beam headlights.
First your gonna have to get the push pins and two bolts out of the inner wheel liner


Then you will take out the 3rd bolt holding the headlight in, this is the bolt that always gives people issues when removing it because they don’t know its there.

Then you will remove the front fascia bumper brackets which are held in with two bolts.


Remove the six bolts holding down the fascia on top of the grille, there are two on each outer end and like 4 in between those.

Remove the two bolts holding down the headlight from the top-front completing the other 2/3 of the existing headlight bolts.

Back of my headlight assembly. Take note of the disconnected Assembly voltage supply connector which gives power to all the bulbs in the headlight. You HAVE to disconnect this just to make sure you don’t short anything or shock yourself, and plus atleast you won’t have to disconnect the battery and lose your vehicle settings!

---------- Post added at 02:35 AM ---------- Previous post was at 02:34 AM ----------
Headlight removed on the left hand side. To get it out on both sides all you have to do is disconnect the clip holding each light from the rear and put some gentle persuasion into pulling the sides closer to the grille towards you, watching out for the clips holding and sealing the light from scraping the fascia beside the grille and part of the fascia that is taped up. After the corner of the light comes out with the two guiding clips behind the orange sidemarker, then use the extending part of the fender as a turning axis and pull it towards you and bam its out, sorry I forgot to get detailed pics of this part.


Apexcone Slim-Ballast HID kit. Any HID brand will work, slim or not, but slim may make it a bit sleeker of an install!

Apexcone slim ballast and igniter in the box with High voltage connectors.

Apexcone HID bulb (6000k) with High voltage connectors to attach to the ballast/igniter output.

Igniter showing a bit after the headlight is installed and sealed up.

Ballast installed with 3M double sided tape and all connected up. It goes like this, connect the ballast input connector to the headlight low beam H11 output connector (you may have to reverse this plug later to get the bulb to light up properly so don’t seal up everything). Then connect high voltage connectors from the igniter to the high voltage input of the bulb. And then when you’re done remove the protective cover of the bulb and put it straight into the headlight without EVER touching the bulb with your fingers or on any surface to prevent future bulb damage.

The ballast installed with 3M double sided tape on the inner part of the metal beam beside the headlight. As you can see there is a material covering it form sight after install. That is the sleekest place to put the ballast because after it is put there you will not be able to see it anymore.


LH Headlight back in. Just do everything in reverse and get those lights back in and put every removed bolt back on from ALL the removed places!
Do you see the ballast or any wires?


