Installing a backup Camera (here we go, finally)

Disclaimer: Links on this page pointing to Amazon, eBay and other sites may include affiliate code. If you click them and make a purchase, we may earn a small commission.

kbuskill

***CAUTION*** I do my own stunts!
Joined
Mar 11, 2017
Posts
5,229
Reaction score
8,115
Location
NE. FL.
The liftgate harness has 4 wires in the plug for the camera. They are Dark Blue, Light Blue, Gray and White.

Mike--Hamilton Chevy

Get a volt meter or test light and check the trucks harness for 12V...

The white should be video positive and one of the Blue wires should be video ground.

Obviously the grey and the other blue would be 12V+ and negative/ground.
 

kbuskill

***CAUTION*** I do my own stunts!
Joined
Mar 11, 2017
Posts
5,229
Reaction score
8,115
Location
NE. FL.
Hello,

today my backup camera showed up in the mail, so i thought I'd start a new thread (mostly because I had a few people mail me on here about the nav radio install and also the backup camera.

I might get started this weekend (but no promises) after I figure how easy it is to remove the tailgate trim etc, mount the camera in the trim piece... etc etc... (I already found some tips on how to fix the bezel, in case the screws break, on youtube).


step 1: ... this is the camera I bought, OEM, but with an RCS cable plug, that goes into the harness and a black and red wire, for power and ground.

Ron

View attachment 199574

Hey Ron... here is a link to a good writeup on the rear camera install... hope it helps you with the trim removal.

https://chevroletforum.com/forum/ta...1/how-adding-back-up-camera-07-c\k-suv-22756/
 

Ebay Mike

Full Access Member
Joined
May 9, 2018
Posts
175
Reaction score
97
Location
Detroit MI
Get a volt meter or test light and check the trucks harness for 12V...

The white should be video positive and one of the Blue wires should be video ground.

Obviously the grey and the other blue would be 12V+ and negative/ground.
There is NO harness in the truck for me to check. All I have is the wiring off the camera in a vehicle that never had a camera.

Mike--Hamilton Chevy

PS: You do not have to remove the wiper motor to get the outer trim panel off. There are three screws that you can use a socket on and the fourth one you have to use an open end wrench but it is not that hard to get it off without taking the wiper motor off.
 

Ebay Mike

Full Access Member
Joined
May 9, 2018
Posts
175
Reaction score
97
Location
Detroit MI
Oh btw.. are there any markings on your camera? lookup the serial and or model online maybe?

It has already been installed so it is too late to look for markings or serial numbers. Too much work to take that trim panel back off for that. Bummer.

Mike--Hamilton Chevy
 
OP
OP
Ron C

Ron C

Full Access Member
Joined
Nov 4, 2017
Posts
727
Reaction score
168
Location
Los Alamos, NM
It has already been installed so it is too late to look for markings or serial numbers. Too much work to take that trim panel back off for that. Bummer.

Mike--Hamilton Chevy

Yeaah taking the trim off and the bezel/applique is quite a bit of work.. I just did that this morning.
 
OP
OP
Ron C

Ron C

Full Access Member
Joined
Nov 4, 2017
Posts
727
Reaction score
168
Location
Los Alamos, NM
Hello,

Well, this morning I started taking the trim off, (I only broke one clip, which I am trying to glue back.)

The nuts come off surprisingly easy, except for the one behind the wiper motor. Of course I had to do it in the driveway and dropped a nut and a bolt, an in gravel that is not easy to find. Got the nut, looking for one motor wiper bolt still.

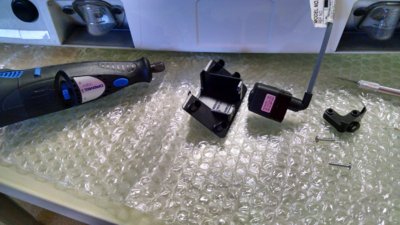
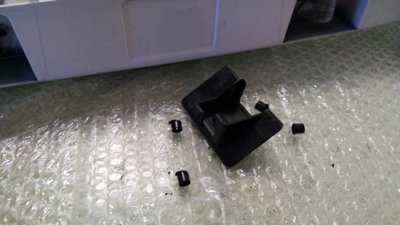
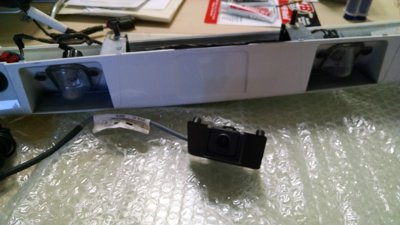
I took the camera 'apart' that is, unscrewed it from the little bracket that goes in the trim piece. The bracket has 4 posts that are used for "welding" the little bracket to the trim piece. I cut them off, the radio/video guy told me it would work easier that way. The trim piece has 4 threaded posts, with nuts and also two clips, one in each corner (in case the posts fail I guess). Getting it off the car is a bit of a hassle, but not terribly difficult.

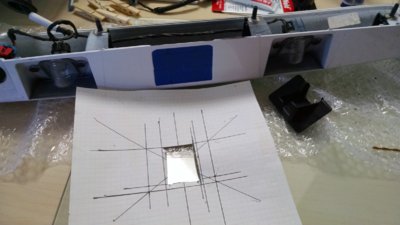
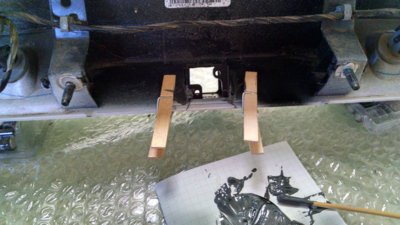
I first cut the posts off the camera bracket, after I took the camera out, and made a template for cutting the hole in the trim piece, stated with the opening too small, and trimmed it so it would fit. I used JB weld to glue the bracket in, works better than epoxy I was told. (epoxy can come off in heat, JB weld does not.

Here are the first pics,

Ron

IMG_20180518_100220320.jpg IMG_20180518_100610011_HDR.jpg IMG_20180518_102353899.jpg IMG_20180518_105638105.jpg IMG_20180518_113425595_HDR.jpg
 
OP
OP
Ron C

Ron C

Full Access Member
Joined
Nov 4, 2017
Posts
727
Reaction score
168
Location
Los Alamos, NM
Well I have the camera in.. but it seems DOA, lots of lines and black screen... The seller is looking into it, and working on a replacement.....
 

Ebay Mike

Full Access Member
Joined
May 9, 2018
Posts
175
Reaction score
97
Location
Detroit MI
Ok I had one of our techs print me out the wiring for the 2013 Tahoe and it shows the camera with 6 wires total. There is one connector that has a Pink which would be key on power and a black which would be ground. The second connector has a white wire which I was told was the Positive camera lead and light blue which is the negative camera lead. Then the gray he said gets blunted out which I take to mean it is not used and the dark blue goes to the BCM somehow. This info helps but I still am not sure what to do since I am not a wiring guy and I am lost at this point!

Mike--Hamilton Chevy
 
OP
OP
Ron C

Ron C

Full Access Member
Joined
Nov 4, 2017
Posts
727
Reaction score
168
Location
Los Alamos, NM
Ok, that makes sense:

The one that goes to the BCM, is probably only used for cars that have it factory installed. That way the BCM can tell the head unit it is there.

The white one I figured would be signal, and if the light blue is ground, you can use those two as the "RCA channel" and attach an RCA plug to it.

If pink is key on power, than you can connect it to a key on pin, in the box next to the steering pedal (in my case it is the red lead that is key on power. Black is ground and needs to go to sheet metal or so.

That scheme makes sense, IF it is a 12V camera. and would sort of be the same setup as mine.


My new camera is in the mail (well in a week), and the leads are different, red/black/RCA.

So it sounds that your dealer guy has it figured out.
 

Forum statistics

Threads
129,208
Posts
1,812,160
Members
92,308
Latest member
madmax442
Top