2015 GMC Yukon LED DRL Problem

Disclaimer: Links on this page pointing to Amazon, eBay and other sites may include affiliate code. If you click them and make a purchase, we may earn a small commission.

Rugdr

TYF Newbie
Joined
May 16, 2018
Posts
2
Reaction score
0
Hey guys. New member here although I have lurked for awhile. Finally decided to join due to a problem I keep having with our 2015 Yukon. The problem we are having is that the LED DRL is working intermittent. Some days it works fine and others it doesn't work at all, or comes on and goes off.

My wife had it at the dealer for a couple of days fixing another issue and we had them take a look at it. One thing that they/we noticed is that the light has been getting a small amount of condensation in it for no particular reason (no cracks, splits, etc.). This condensation comes and goes with the weather and dries out relatively fast in the sun. When they checked the light, they said that was the issue and that we needed to purchase an entire new light housing for approx. $1600, which they then came down to $1100 after bitching. Honestly, I feel like their is a much simpler answer for the problem than buying a new light housing.

Obviously, it is out warranty at 72,000 miles, but I would think that it would be considered a safety issue with it not working properly. Apparently, I am wrong, so it's out of warranty. Has anybody else had a similar issue with the LED DRL and if so what was the fix and/or answer?

I plan to pull the light out tonight and check everything over and see if I can find anything. It would just be helpful if somebody else had the same issue. That way I knew which direction to head in. Thanks in advance for the help.
 

Tahoe14

Full Access Member
Joined
Jun 10, 2014
Posts
1,682
Reaction score
894
Location
Central Fl
If you are going to spend that much I would just buy a GMEPP extended warranty and have it repaired under warranty. Look in "General Discussion" on page 2 or 3 and there should be a thread titled "extended warranty" with the names and phone numbers of on-line dealers that offer the best pricing. You could then have your Dealer match or beat the price or purchase from the on-line Dealer.
 
OP
OP
R

Rugdr

TYF Newbie
Joined
May 16, 2018
Posts
2
Reaction score
0
Checked into the extended warranty and that is a no go...lights or housings are not covered. So I'm back to square one. I tore everything down the other night, checked all the connections, checked all the fuses and relays and everything checked out fine. I have no idea where to go from here...
 

Tahoe14

Full Access Member
Joined
Jun 10, 2014
Posts
1,682
Reaction score
894
Location
Central Fl
I need to check with my Dealers service department. On the Corvette forum they are getting their headlights replaced with the GMEPP extended warranty.
 

brentcooper315

TYF Newbie
Joined
Aug 14, 2019
Posts
5
Reaction score
3
FOUND POSSIBLE SOLUTION (well for me at least)

My exact issue: Front passenger side DRL LED trim not working on 2015 GMC Yukon SLT

So I've been looking all around the internet for a solution to this issue and I finally came across this article today. I never found a solution for myself so I had to figure it out. Sorry in advance if someone else somewhere has posted a solution to this.

My Issue:
I was having the exact same issue with mine and was not willing to pay an outrageous amount of money for a new assembly so I started to do some research. After removing the assembly and running some continuity test on the light harness I noticed that the LED trim (DRL) had power running to it like it was suppose to even when the light was not working. I then pulled the two round light bulb covers from the back of the housing to take a look inside. (SIDE NOTE - my condensation issue in the light was due to the round O ring gasket on the high beam light cover not sealing properly. I saw water all around that gasket.) So after looking inside I saw a circuit board and the bottom and wanted to take a closer look at it but it was hard to see. I had no choice but to separate the light housing. YES I know that this is a daunting task and I do not recommend anyone doing this unless you are fully confident in doing so.

What I noticed:
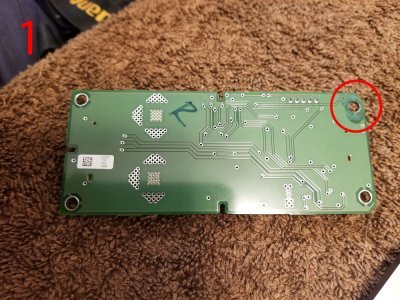
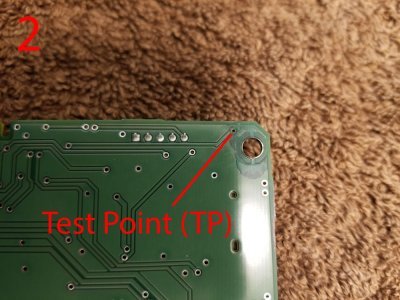
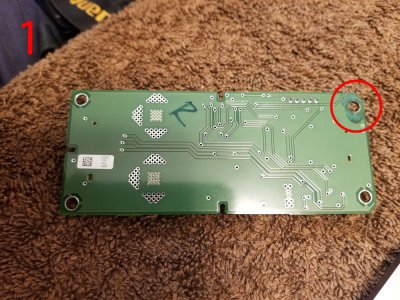
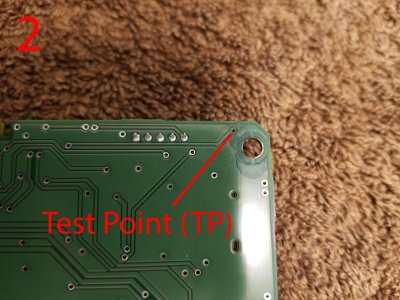
The circuit board was mounted at three points on the corner by screws, but not at the 4th point. This mounting point was just sitting on a guide pin and that was where MY problem was. Due to the light having water and condensation buildup, it was causing corrosion on the circuit board right at this test point - see image 1 and 2. The test point is the small little hole beside the mounting point. This was causing the light to short out.

224034-f394b7732e1d3aba511507043fcd3be1.jpg

224035-721c001618861d93c34ff51f9f71bfb2.jpg

What I did to fix it:
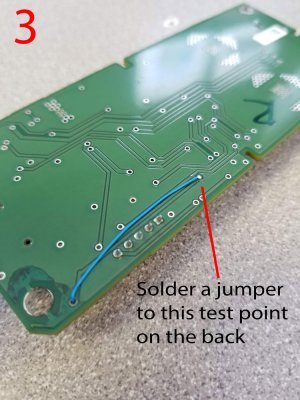
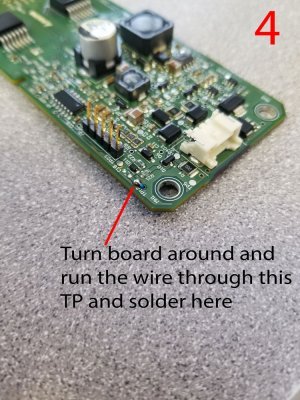
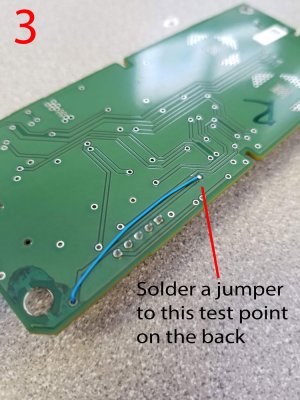
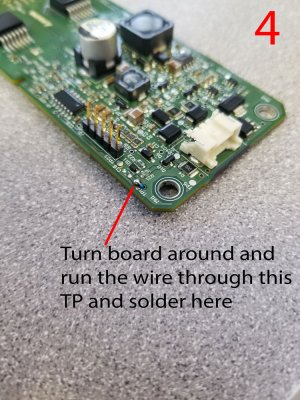
I have a friend that works on circuit boards for a living and he fixed it in literally 2 minutes haha, but I feel that it can be fixed by anyone that knows how to solder. He just simply bypassed the bad corroded circuit with a small wire (Image 3, Image 4). He said that he is 99% sure that it was the issue and it should work just fine. After getting home and reconnecting everything and resealing the light and holding my breath....... IT WORKED!

224046-8203d8801342292df3a0b706da35ae02.jpg

224047-f5b155b997b38799ae4b3c89d830d148.jpg

Remember to keep in mind that this worked great for me, but may not work for you. It is also a very daunting task and please take caution when doing this. Also taking the light apart and putting it back together is a tough one as well lol. Trust me. Hope this helps

picture-1.jpg picture-2.jpg picture-3.jpg picture-4.jpg
 
Last edited:

reath1

Member
Joined
Mar 9, 2015
Posts
39
Reaction score
6
Brent, thanks for the very detailed write up. I have the same problem and hopefully the same fix is needed. Exactly how did you open the assembly?
 

brentcooper315

TYF Newbie
Joined
Aug 14, 2019
Posts
5
Reaction score
3
I just set my oven to 250 degrees and put the light in for 10mins. You want to make sure that the edges of the light aren't touching the walls of the oven. Also be sure to place the assembly clear side up with only the black back of the light touching the rack. After the 10mins are up, take the assembly out (with gloves) and carefully pry back the tabs all around the light that old the backing to the clear shield. At this point the light will start cooling down and will need to be heated up again. You can repeat the oven step over and over till finished or just use a heat gun.

After pulling the tabs back and heating the light back up, I then took a flathead screw driver and went around the edges carefully prying the adhesive away from the light shield. At this point you will have to bend some of the black housing away but TRY NOT TO BREAK IT. It can easily be bent back with heat when done. After a few rounds of prying the light will start to separate. You then will need to carefully remove the rest of the black adhesive from the clear shield and the black plastic housing.

Once you have done all of that you will then need to disconnect and remove the inside components of the light with a torx head screwdriver (sorry I cant remember the exact size). There are also tow on the back side of the light as well that hold the inside together. (SIDE NOTE - DO NOT TOUCH THE REFLECTIVE LIGHT SURFACE) If you touch the reflective surface and have to clean it off, they will scratch very easily.

After the insides have been removed you will have found the golden ticket (circuit board) screwed in place with only three screws. Remove and fix. Now remember that my issue may be different than yours. I highly doubt it though since most new Yukons with this style light are all having the same issue and this was the only CLEAR explanation to mine. The people that look into this and see that the issue is the same then we will have more proof.

Keep in mind to double if not triple check to make sure EVERYTHING is screwed back into place and all harnesses are reconnected before moving forward. You do not want to take this back apart because of missing something haha.

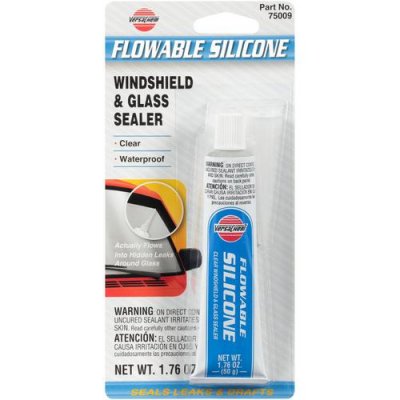
When putting everything back together just simply work in reverse and remember to be careful. I bought two tubes of silicone from O'reilly Auto Parts and it worked just fine. I would recommend bending the black tabs and any other edges that were bent out of shape back in place on the back half of the assembly first. This way it will help hold everything together while curing. Be generous when applying the silicone and make sure to cover every oz of the channel on the black half that the clear shield will seat in. You have about 10 mins to work with so no need to rush too fast. Once I applied the silicone and snapped the assembly back together I just sat it in a good position to keep everything level and waited 24 hours. For the first few hours you will need to go check the silicone because it will run and you will have to wipe up excess and apply more to low sections, but you should be good. After 24 hours you are good to go.

This task scared me at first but in the end I felt like the Apollo 13 crew after landing back on earth. I shared my experience with all my friends and expressed to them how GM wasn't going to get one over on me lol.

I looked on gm parts direct and they sell every part of that headlight assembly except the circuit board so that was a red flag to me.

Here is a picture of the silicone I used btw. If anyone knows of a better sealer, please share.

silicone.jpg
 

reath1

Member
Joined
Mar 9, 2015
Posts
39
Reaction score
6
THANK YOU SIR! Yes, mine is working intermittently and also has moisture in it so I am betting that my problem is the same. Thanks again for this thorough write up. I too have been looking high and low for a fix for this because I didn't want to shuck out $900 for a new light.
 

brentcooper315

TYF Newbie
Joined
Aug 14, 2019
Posts
5
Reaction score
3
No problem at all. I just hate looking for a solution and people just mention it with no details lol. If you decide to tackle this, let me know how it turns out
 

Forum statistics

Threads
129,117
Posts
1,810,705
Members
92,203
Latest member
firedog9518

Latest posts

Top