08 Tahoe Front Fender Replacement

Disclaimer: Links on this page pointing to Amazon, eBay and other sites may include affiliate code. If you click them and make a purchase, we may earn a small commission.

tiktok4321

Full Access Member
Joined
Feb 9, 2017
Posts
108
Reaction score
13
I busted up my front passenger fender on my Tahoe last night. Good news seems like replacements are pretty inexpensive, though I think OEM was aluminum and I can only buy steel. No biggie. Adds a few pounds.

I can't find ANY online video on how to remove and replace, though. The 07 seems simple, but I know I'm not that lucky.

I also can't find one painted. Should I pre paint or install and blend? It's white, so I don't know how that would affect it, but it makes the cost start exponentially climbing.

Any help would be great. Thanks.

Sent from my SAMSUNG-SM-N920A using Tapatalk
 

iamdub

Full Access Member
Joined
Apr 23, 2016
Posts
20,758
Reaction score
44,612
Location
Li'l Weezyana
I busted up my front passenger fender on my Tahoe last night. Good news seems like replacements are pretty inexpensive, though I think OEM was aluminum and I can only buy steel. No biggie. Adds a few pounds.

I can't find ANY online video on how to remove and replace, though. The 07 seems simple, but I know I'm not that lucky.

I also can't find one painted. Should I pre paint or install and blend? It's white, so I don't know how that would affect it, but it makes the cost start exponentially climbing.

Any help would be great. Thanks.

Sent from my SAMSUNG-SM-N920A using Tapatalk
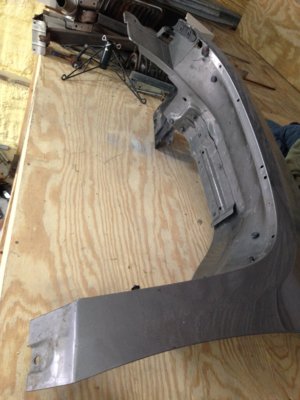
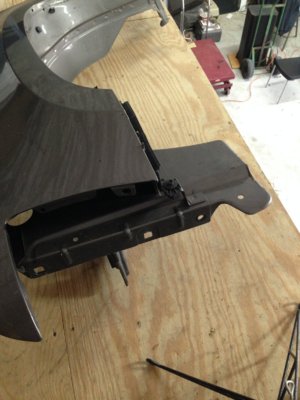
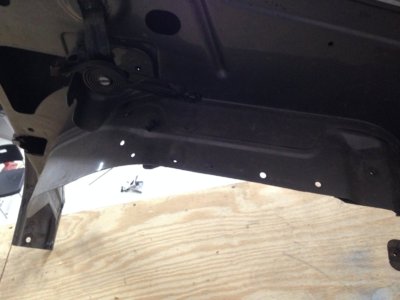
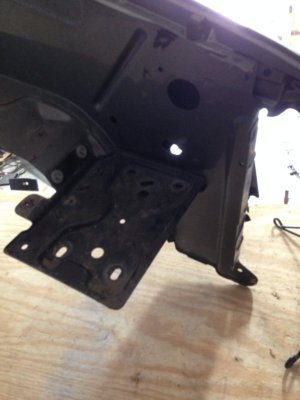
I have a fender in my shop to replace my wrinkled driver's side fender. I'll take some pics of it's mounting points, hopefully those will help.

I don't believe the OEM fenders were ever aluminum. The replacement fender I have is an OEM part and it's steel. I got mine from a guy that was parting out an Avalanche. It's the same color as my Tahoe and is dent-free, but the paint has lots of chips and scratches which is why I haven't swapped it on yet. Have you searched your local salvage yards or Craigslist for someone parting out a Tahoe, Suburban or Avalanche of your Tahoe's color?
 
OP
OP
tiktok4321

tiktok4321

Full Access Member
Joined
Feb 9, 2017
Posts
108
Reaction score
13
I have a fender in my shop to replace my wrinkled driver's side fender. I'll take some pics of it's mounting points, hopefully those will help.

I don't believe the OEM fenders were ever aluminum. The replacement fender I have is an OEM part and it's steel. I got mine from a guy that was parting out an Avalanche. It's the same color as my Tahoe and is dent-free, but the paint has lots of chips and scratches which is why I haven't swapped it on yet. Have you searched your local salvage yards or Craigslist for someone parting out a Tahoe, Suburban or Avalanche of your Tahoe's color?
Thanks for the info. I'll do some looking before committing. It's the install that intimidates me most.

Sent from my SAMSUNG-SM-N920A using Tapatalk
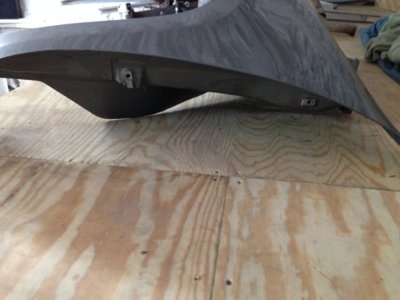
 

Doubeleive

Wes
Supporting Member
Joined
Nov 7, 2017
Posts
23,701
Reaction score
34,641
Location
Stockton, Ca.
fenders are usually pretty easy, just have to look it over, you can see from the replacement where all the bolt holes are and usually you will need to unclip the bumper cover, there will be a couple bolts in the doorjam and one under the door hinge area the rest are along the top of the edge of the engine compartment/hood and wheel well. r&r there usually not a perfect fit so you may have to push or pull a bit to get it aligned right.
 
OP
OP
tiktok4321

tiktok4321

Full Access Member
Joined
Feb 9, 2017
Posts
108
Reaction score
13
Alrighty then. Did the swap yesterday. Learned a lot. Took me about 4 hours, but I think if the sequence is right, it can be done in 2. Here's a step by step to be most efficient.

1. Remove the hood. Unclip strut, remove 4 13mm bolts that attach hinge to hood. Pop out trim that surrounds hood hinge. A two man job!!

2. Remove fender liner. Don't need to remove wheel. There may be a harness plasti-clipped to it from the back side.

3. Remove headlight. Loosen two bolts between fender and bumper cover, pull out bumper cover, remove one bolt attaching bumper cover to frame from underneath (it's the one that faces forward, not up or down).

4. Remove bracket attached to stud located under c-bracket connecting fender to firewall. This should be two 10mm nuts

5. Remove two 10mm bolts from under air intake. To get to them, just lift up the air intake and pop out plasti-clips.

6. Remove all the 13mm bolts. One from underneath by door (there is a 10mm bolt that hold a small piece of trim to the sidestep that makes it easier to remove the fender in the end), two in door jamb, three around the hood hinge, two in top middle, three behind headlight. Then the whole thing just pops out!

Don't forget to transfer the hood hinge to new fender.

I may have missed a couple things, so I may edit this as I review my video...
 
Last edited:

iamdub

Full Access Member
Joined
Apr 23, 2016
Posts
20,758
Reaction score
44,612
Location
Li'l Weezyana
Alrighty then. Did the swap yesterday. Learned a lot. Took me about 4 hours, but I think if the sequence is right, it can be done in 2. Here's a step by step to be most efficient.

1. Remove the hood. Unclip strut, remove 4 13mm bolts that attach hinge to hood. Pop out trim that surrounds hood hinge. A two man job!!

2. Remove fender liner. Don't need to remove wheel. There may be a harness plasti-clipped to it from the back side.

3. Remove headlight. Loosen two bolts between fender and bumper cover, pull out bumper cover, remove one bolt attaching bumper cover to frame from underneath (it's the one that faces forward, not up or down).

4. Remove bracket attached to stud located under c-bracket connecting fender to firewall. This should be two 10mm nuts

5. Remove two 10mm bolts from under air intake. To get to them, just lift up the air intake and pop out plasti-clips.

6. Remove all the 13mm bolts. One from underneath by door (there is a 10mm bolt that hold a small piece of trim to the sidestep that makes it easier to remove the fender in the end), two in door jamb, three around the hood hinge, two in top middle, three behind headlight. Then the whole thing just pops out!

Don't forget to transfer the hood hinge to new fender.

I may have missed a couple things, so I may edit this as I review my video...

Thank you for posting this! I'll refer to it when I swap mine.
 

ramchol76

Member
Joined
Nov 25, 2019
Posts
66
Reaction score
17
@tiktok4321 thanks for the summary, do you have the video published anywhere? I need to remove fender to fix a water intrusion behind.
 
OP
OP
tiktok4321

tiktok4321

Full Access Member
Joined
Feb 9, 2017
Posts
108
Reaction score
13
@tiktok4321 thanks for the summary, do you have the video published anywhere? I need to remove fender to fix a water intrusion behind.
Sorry. That was two years ago. I never had enough good footage to compile into a how to. Sorry about that.

If you go over the steps I listed above looking at the vehicle before starting, I think you'll get the gist of it. The most important aspect is the order of things to keep from wasting too much time.

Good luck!
 

Forum statistics

Threads
129,189
Posts
1,811,918
Members
92,294
Latest member
Sowegatahoe87
Top