After days of searching how to color match plastic car pieces, which would be our black textured plastics (door handles, bumper cap for front and rear, lower valance, and fender flares) I did figure out how to do it, so I'll share what I did to help anyone planning to do this and wants to save money.
What you will need
1. 220 grit sandpaper
2. 400 grit sandpaper
3. 1500 grit sandpaper
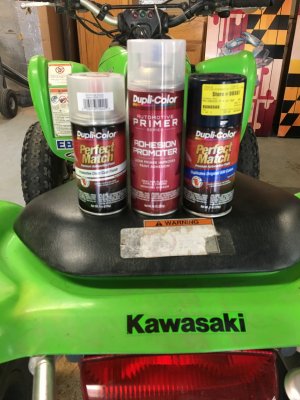
4. Duplicolor Automotive primer adhesion promoter
5. Duplicolor clear coat
6. Duplicolor color matched paint. I got mine at advance auto. If they don't have the color on the shelf just go on duplicolors website and find the part number and ask them to order it for you.

It cost about $35 for everything
Before you start I recommend pulling whatever you're painting off the truck and paint it where there is no wind. I did mine in my garage with the door open to air it out while you spray the paint. If you're painting the bumper cap like I did, then you will need to crawl underneath the truck and reach up to the bumper and you will feel clips every 4-5 inches. To take the cap off you will need to squeeze the tabs, I used pliers, and pull on the cap from the outside at the same time. It will be much quicker if you have someone helping you but if you're doing it yourself it takes about 30-45 mins to get it off. It's a bit of a pain in the ass to do but it's the hardest part.
Now to start the painting process
The prep is the most important part of the whole process so don't make any shortcuts.
Step:
1. Clean part with soap and water then dry. Make sure it's completely dry.
2. Once dry sand with 220 grit sandpaper.
3. Wipe off surface with clean microfiber towel or blow off with air compressor. I did both just to make sure it was clean.
4. After wiping surface use the adhesion promoter and spray one light coat then go back over with 2 more coats getting a little heavier each time
5. Give the adhesion promoter about 10 mins to dry then take your 400 grit sandpaper and sand the part again. You should start to feel the part becoming smooth now.
6. Once done sanding repeat 3rd step
7. Repeat step 4 once cleaned off
8. Give it another 10 mins to dry then sand with 1500 grit sandpaper
9. Repeat step 3
10. Repeat step 4
11. Within 5-10 mins of spraying adhesion promoter you will start painting. First go over with a light coat. Then medium coat. Then 2 or 3 heavy coats trying not to cause any runs.
12. Wait 30 mins after you finish painting then you can spray it with clear coat. I did one light coat, one medium coat and 2 heavy coats.
13. Wait at least 3-4 hours before putting the part back on or you will put finger print marks in the paint. It's recommended to wait over night but I put mine on after 3 hours and it was fine.
Hopefully this can help someone and save them some money doing it themselves instead of paying someone. If it's done right it'll surprise you how well it turns out considering it was done with spray cans.
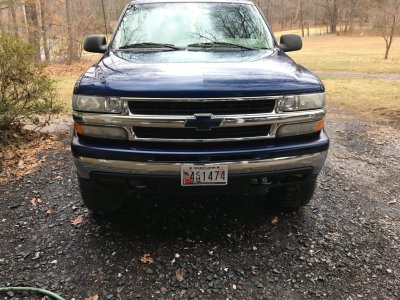
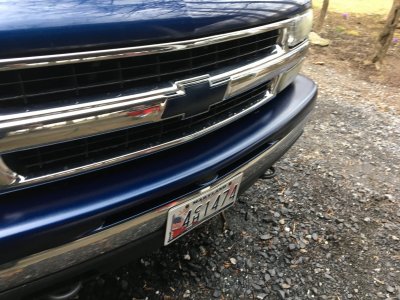
My finished bumper cap. Took a total of 5.5 hours


What you will need
1. 220 grit sandpaper
2. 400 grit sandpaper
3. 1500 grit sandpaper
4. Duplicolor Automotive primer adhesion promoter
5. Duplicolor clear coat
6. Duplicolor color matched paint. I got mine at advance auto. If they don't have the color on the shelf just go on duplicolors website and find the part number and ask them to order it for you.

It cost about $35 for everything
Before you start I recommend pulling whatever you're painting off the truck and paint it where there is no wind. I did mine in my garage with the door open to air it out while you spray the paint. If you're painting the bumper cap like I did, then you will need to crawl underneath the truck and reach up to the bumper and you will feel clips every 4-5 inches. To take the cap off you will need to squeeze the tabs, I used pliers, and pull on the cap from the outside at the same time. It will be much quicker if you have someone helping you but if you're doing it yourself it takes about 30-45 mins to get it off. It's a bit of a pain in the ass to do but it's the hardest part.
Now to start the painting process
The prep is the most important part of the whole process so don't make any shortcuts.
Step:
1. Clean part with soap and water then dry. Make sure it's completely dry.
2. Once dry sand with 220 grit sandpaper.
3. Wipe off surface with clean microfiber towel or blow off with air compressor. I did both just to make sure it was clean.
4. After wiping surface use the adhesion promoter and spray one light coat then go back over with 2 more coats getting a little heavier each time
5. Give the adhesion promoter about 10 mins to dry then take your 400 grit sandpaper and sand the part again. You should start to feel the part becoming smooth now.
6. Once done sanding repeat 3rd step
7. Repeat step 4 once cleaned off
8. Give it another 10 mins to dry then sand with 1500 grit sandpaper
9. Repeat step 3
10. Repeat step 4
11. Within 5-10 mins of spraying adhesion promoter you will start painting. First go over with a light coat. Then medium coat. Then 2 or 3 heavy coats trying not to cause any runs.
12. Wait 30 mins after you finish painting then you can spray it with clear coat. I did one light coat, one medium coat and 2 heavy coats.
13. Wait at least 3-4 hours before putting the part back on or you will put finger print marks in the paint. It's recommended to wait over night but I put mine on after 3 hours and it was fine.
Hopefully this can help someone and save them some money doing it themselves instead of paying someone. If it's done right it'll surprise you how well it turns out considering it was done with spray cans.
My finished bumper cap. Took a total of 5.5 hours


Last edited:
