Transmission Fluid Flush??

Disclaimer: Links on this page pointing to Amazon, eBay and other sites may include affiliate code. If you click them and make a purchase, we may earn a small commission.

Meccanoble

Full Access Member
Joined
Oct 3, 2016
Posts
1,166
Reaction score
353
Location
Georgia
Thanks, assuming Wix or AC Delco filter and gasket should be fine? Which gaskets should I avoid?
 

Meccanoble

Full Access Member
Joined
Oct 3, 2016
Posts
1,166
Reaction score
353
Location
Georgia
Sorry for the million questions. I followed everything except what is needed to be removed to get pan out after unbolting. Any more pics or experiences to help with this part?
 

TheAutumnWind

Full Access Member
Joined
Jan 8, 2015
Posts
3,222
Reaction score
1,919
Sorry for the million questions. I followed everything except what is needed to be removed to get pan out after unbolting. Any more pics or experiences to help with this part?
http://www.gmfullsize.com/threads/how-to-4l60e-transmission-flush-filter-change.179148/

Specifically here:


At this point, I'll go over how to change the filter.

As I mentioned earlier, you'll want to pump out the first 3-4 quarts to make dropping the pan less messy. Once you've done that, you can begin loosening bolts on the pan.

Some folks use a pry bar to move the shift linkage out of the way to drop the pan, but I chose to remove the rear screw and loosen the front screw on the bracket so I wouldn't damage anything. Use a size 40 TORX bit on a 3/8 drive ratchet.

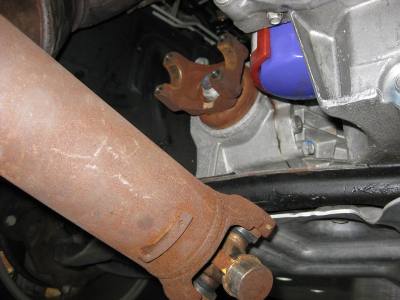
The shift linkage is located on the driver's side of the trans. The two Torx screws are on the top looking at it from the ground towards the rear of the trans. Those of us with a 4WD or AWD will need to remove the front D-shaft from the front axle to gain better access. It will rest on the exhaust Y-pipe. Some have done it without removing it, but I couldn't tell you how.
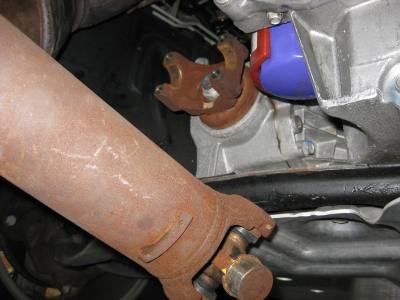
TransFlush011.jpg

Remove the pan bolts and snake the pan out. You'll see this. Obviously, be sure you've got a catch pan for any residual fluid.
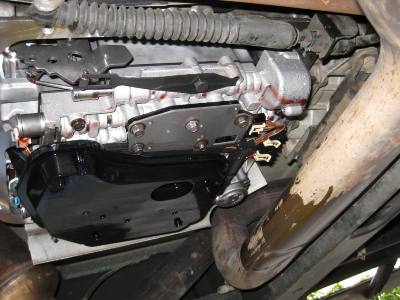
TransFlush012.jpg

Now it's time to change the filter and filter seal. Pull straight down on the filter. You may have to twist it a little. Be careful because there will be some fluid in there. Once removed, look at the hole that the tube on the filter came from. You'll see the seal that matches the one in the kit. It's a huge PITA to get out. Some just inspect it and leave it alone if it looks good. I chose to replace it. Most folks use a hook tool to get it out. Mine didn't feel like cooperating. So I used a small flathead screwdriver and a light touch with a mallet. Once I got the edge away from the wall, I used needle nose pliers to get it out. Denaliano said anyone could borrow his reverse pliers to get this thing out (nice to know that now). He'll even pay for shipping.:crazy: In all seriousness though, be VERY careful not to damage the metal wall. It needs to seal tightly around the filter.

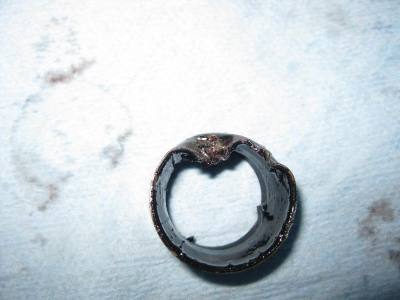
Here's what the filter seal looked like once I got it out.:eek:
TransFlush015.jpg

To place the new seal, coat it in trans fluid and use a socket of the same diameter on an extension (to give you something to hold onto) and tap it into place. The bottom of the seal should be flush with the bottom of the hole. Now, just seat the filter and be sure you've got it oriented correctly. It should look like this.
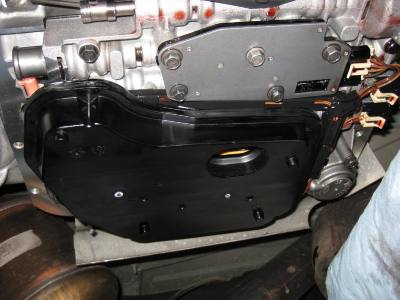
TransFlush016.jpg

Let's turn our attention to the pan. Here's a shot of mine after removal.
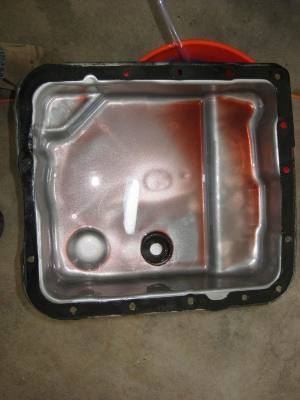
TransFlush013.jpg

Remove the old gasket and clean the pan and magnet. Use a couple of bolts to orient the new gasket and secure the pan back to the trans. Replace the remaining bolts and get them finger tight. Torque them to 97 in-lbs. Next, replace the rear Torx screw on the shift linkage bracket and tighten the front one.

Just clean up any spilled ATF (especially from the exhaust) and that's it for the pan/filter.

Back to the flush procedure.

Once you've completed the flush/fill cycles, just remove the hose, replace the fitting with the transmission line, fill the transmission to full cold line on the dipstick, start the truck and warm up the trans. When hot, check and fill to line on dipstick.

Congratulations! You've just changed ALL of you trans fluid. This is not a back-flush and will not dislodge any particles in the tranny. It is completely safe and easy to do. It may sound difficult, but once you get the fitting made, you can do a complete flush in less than an hour for only the cost of the fluid.

A big thanks goes out to Butch at dt.com for sharing the idea.
 

Meccanoble

Full Access Member
Joined
Oct 3, 2016
Posts
1,166
Reaction score
353
Location
Georgia
I'm stuck on the post below but I'm sure it Will make sense when i look at it.


Some folks use a pry bar to move the shift linkage out of the way to drop the pan, but I chose to remove the rear screw and loosen the front screw on the bracket so I wouldn't damage anything. Use a size 40 TORX bit on a 3/8 drive ratchet.

The shift linkage is located on the driver's side of the trans. The two Torx screws are on the top looking at it from the ground towards the rear of the trans. Those of us with a 4WD or AWD will need to remove the front D-shaft from the front axle to gain better access. It will rest on theexhaustY-pipe. Some have done it without removing it, but I couldn't tell you how.
TransFlush011.jpg
 

TheAutumnWind

Full Access Member
Joined
Jan 8, 2015
Posts
3,222
Reaction score
1,919
the shift linkage partially obstructs pan removal. you can just push it out of the way but that person chose to loosen the mounting screws for the linkage.
 

NGAneer

Full Access Member
Joined
Jan 21, 2014
Posts
1,783
Reaction score
1,023
Location
NWGA
I had to unbolt the front driveshaft, remove the shift linkage (PAIN), and unbolt the rear of the y-pipe to get the pan out. The y-pipe was the worst because a bolt broke and I had to spend time after the flush drilling it out and replacing it with new stainless hardware.

The only other pain I ran into was getting the filter seal out. I had one pick, a 90 degree, and if I'd had a set of them I'm sure that I could've gotten the seal out easier. Instead, I had to end up bending the seal with a screw driver and pulling it out with pliers.
 

Meccanoble

Full Access Member
Joined
Oct 3, 2016
Posts
1,166
Reaction score
353
Location
Georgia
I had to unbolt the front driveshaft, remove the shift linkage (PAIN), and unbolt the rear of the y-pipe to get the pan out. The y-pipe was the worst because a bolt broke and I had to spend time after the flush drilling it out and replacing it with new stainless hardware.

The only other pain I ran into was getting the filter seal out. I had one pick, a 90 degree, and if I'd had a set of them I'm sure that I could've gotten the seal out easier. Instead, I had to end up bending the seal with a screw driver and pulling it out with pliers.

These are the type of stories that scare me from using that method of getting pan out. I have been looking at this video for the past 2 days and though he did things I wouldnt agree with compared to original tutorial on this thread, the process of removing pan seemed to be simplest. Assuming this process still requires removing the shift linkage but anything else seems scary....


Meccanoble

Full Access Member
Joined
Oct 3, 2016
Posts
1,166
Reaction score
353
Location
Georgia
Just checked below and see spare but seems deceiving based off everyone feedback...


mizzouguy

Full Access Member
Joined
Apr 7, 2015
Posts
523
Reaction score
153
Location
Lake of the Ozarks, MO
These are the type of stories that scare me from using that method of getting pan out. I have been looking at this video for the past 2 days and though he did things I wouldnt agree with compared to original tutorial on this thread, the process of removing pan seemed to be simplest. Assuming this process still requires removing the shift linkage but anything else seems scary....


Dear god dont use an electric drill/impact when you put it back together and criss-cross as you tighten it down. LOL
 

Forum statistics

Threads
129,106
Posts
1,810,416
Members
92,184
Latest member
WhiteHorseBFD792
Top