withac
Full Access Member
This will leave the low beams on when you turn on the high beams, real nice. I think this method works up to the 2002's. I think from '03 and up you use a different method where you jam diodes in the fuse box. Maybe someone else will post up on that one.
I'm having a hard time telling where to put these. I put the fog light mod in the inside section because the mod was done inside. This mod is done under the hood and behind the lights. Since the lights are outside I put it here. If a mod wants to put them both where they belong feel free.
I know there are lots of posts on the 4 Hi mod for the earlier models but they’ve gotten pretty lengthy and confusing so I thought I’d post up how I just did mine. Hopefully this will make sense and put everything together in one post. I’ve drawn from the other posts as well as from some questions I’ve had answered, so thanks to everyone who has contributed on the other threads.
From Jkmotorsports: Pre-03 models
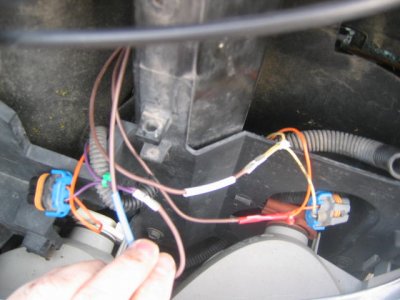
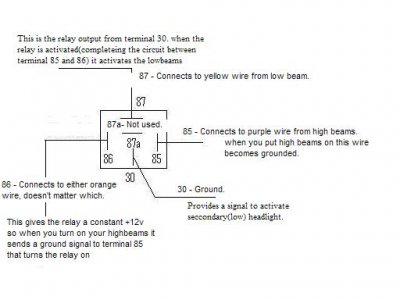
Behind the driver's side headlamp assembly, locate the harnesses to the low and high beam bulbs. The low beam should have a yellow and an orange wire. The high beam should have a purple and an orange wire. When buying the relay, JKMotorsports says “Ask for a typical SPDT automotive relay, such as those used in some aftermarket driving/fog light systems. These will have 5 contacts labeled 85, 86, 87, 87a, and 30. You might have better luck going to your local stereo/alarm shop, as these are always used , especially in alarm installations. They'll know exactly which one to give you; the type used in aftermarket automotive integration are basically industry standard.”
A friend who installs car stereos and theft deterrent systems sold it to me for five bucks.
The first pic shows the basic materials I used. Relay, wire, shrink tubing, insulated crimp female connectors for the relay, dielectric grease, and I forgot to include the uninsulated crimp wire connectors.
First I crimped 18” of wire to the female connectors, using some dielectric grease on the wires. To help keep out moisture I then put some shrink tubing around where the wire enters the connector. It wouldn’t shrink tight so I used a smaller size over the larger. Getting it over the larger was a pain. I didn’t have wire colored to match the lights so I used different color shrink tubing on each to help identify them. The second picture shows this.
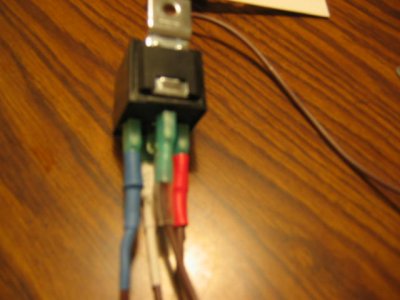
First, I wired the relay following the third picture (thanks FergHoe) and you only need to perform this on one side of the vehicle (thanks JK).
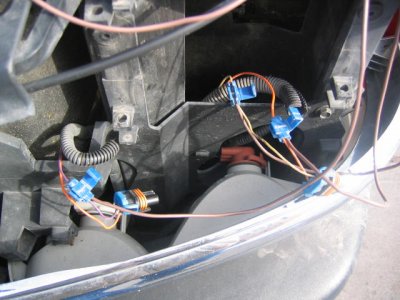
I did this with wire taps to make sure I had it right before making it permanent, see picture 4. To help keep it dry, I kept the relay in the engine compartment and threaded the wires through a gap to get to the headlight compartment.
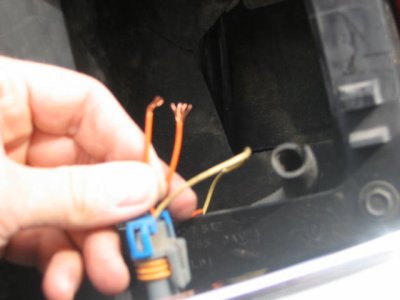
Once I knew things worked like they should, I removed the wire taps and cut the headlight wires where the tap had nicked them. I used dielectric grease on every crimp connection. I then stripped enough headlight wire to insert into the uninsulated crimp connector. I fanned the headlight wires out so I could intertwine them before twisting them together, hopefully giving a better, stronger connection, see picture 5. Crimp the twisted headlight wires in one end of a crimp connector.
Next, slide a piece of shrink tubing up the appropriate wire coming from the relay. Strip and crimp this wire. Since the two pieces of the cut headlight wire are now side by side, I took a small zip tie and tied them together to help keep the strain off the shrink tubing or the connector.
Picture 6 shows the orange wire with the shrink tubing in place and the yellow and purple wires with the bare connector and the shrink tubing slid up the wire.
The 7th pic shows the shrink tubing in place.
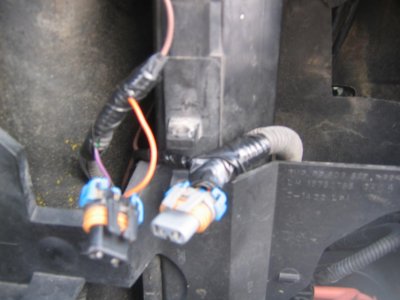
Next I stuffed the wires back in the factory wire looms and taped them up with electrical tape like they were before I started, picture 8.
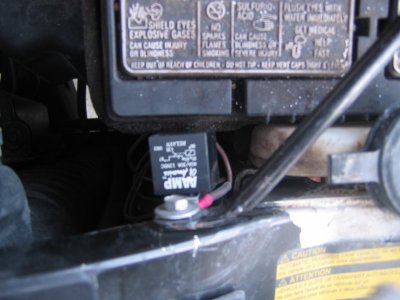
Lastly (picture 9) I mounted the relay (it had a little mounting tab on it) and grounded out the ground wire using a bold from a support just next to the battery.
I can only put five pics in a post so I'll put the rest in the next post.
I'm having a hard time telling where to put these. I put the fog light mod in the inside section because the mod was done inside. This mod is done under the hood and behind the lights. Since the lights are outside I put it here. If a mod wants to put them both where they belong feel free.
I know there are lots of posts on the 4 Hi mod for the earlier models but they’ve gotten pretty lengthy and confusing so I thought I’d post up how I just did mine. Hopefully this will make sense and put everything together in one post. I’ve drawn from the other posts as well as from some questions I’ve had answered, so thanks to everyone who has contributed on the other threads.
From Jkmotorsports: Pre-03 models
Behind the driver's side headlamp assembly, locate the harnesses to the low and high beam bulbs. The low beam should have a yellow and an orange wire. The high beam should have a purple and an orange wire. When buying the relay, JKMotorsports says “Ask for a typical SPDT automotive relay, such as those used in some aftermarket driving/fog light systems. These will have 5 contacts labeled 85, 86, 87, 87a, and 30. You might have better luck going to your local stereo/alarm shop, as these are always used , especially in alarm installations. They'll know exactly which one to give you; the type used in aftermarket automotive integration are basically industry standard.”
A friend who installs car stereos and theft deterrent systems sold it to me for five bucks.
The first pic shows the basic materials I used. Relay, wire, shrink tubing, insulated crimp female connectors for the relay, dielectric grease, and I forgot to include the uninsulated crimp wire connectors.
First I crimped 18” of wire to the female connectors, using some dielectric grease on the wires. To help keep out moisture I then put some shrink tubing around where the wire enters the connector. It wouldn’t shrink tight so I used a smaller size over the larger. Getting it over the larger was a pain. I didn’t have wire colored to match the lights so I used different color shrink tubing on each to help identify them. The second picture shows this.
First, I wired the relay following the third picture (thanks FergHoe) and you only need to perform this on one side of the vehicle (thanks JK).
I did this with wire taps to make sure I had it right before making it permanent, see picture 4. To help keep it dry, I kept the relay in the engine compartment and threaded the wires through a gap to get to the headlight compartment.
Once I knew things worked like they should, I removed the wire taps and cut the headlight wires where the tap had nicked them. I used dielectric grease on every crimp connection. I then stripped enough headlight wire to insert into the uninsulated crimp connector. I fanned the headlight wires out so I could intertwine them before twisting them together, hopefully giving a better, stronger connection, see picture 5. Crimp the twisted headlight wires in one end of a crimp connector.
Next, slide a piece of shrink tubing up the appropriate wire coming from the relay. Strip and crimp this wire. Since the two pieces of the cut headlight wire are now side by side, I took a small zip tie and tied them together to help keep the strain off the shrink tubing or the connector.
Picture 6 shows the orange wire with the shrink tubing in place and the yellow and purple wires with the bare connector and the shrink tubing slid up the wire.
The 7th pic shows the shrink tubing in place.
Next I stuffed the wires back in the factory wire looms and taped them up with electrical tape like they were before I started, picture 8.
Lastly (picture 9) I mounted the relay (it had a little mounting tab on it) and grounded out the ground wire using a bold from a support just next to the battery.
I can only put five pics in a post so I'll put the rest in the next post.
Attachments

Last edited: